Loveria
Setup Guide
Setup Guide
Licence
To activate and access the admin section you have to go through the Envato Licence Verification process by just adding the your pucrhase information.
You can complete this Licence Verification by putting following licence information
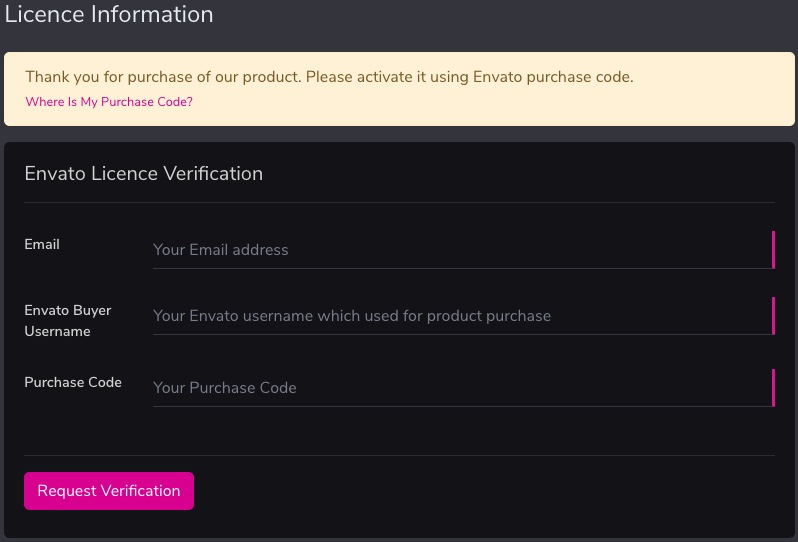
- Email – Here you have to add your email.
- Envato Buyer Username – In this field you have to add your Envato Buyer Username to activate licence.
- Purchase Code – Using this you have to add your Purchase Code of product to activate licence.
- Request Verification – By click on this button you can request for licence verification.
Manage Users
Using this you will be able to manage all your user related operation & can view the details of the all users by visiting each user separately from selecting the user from the users list.
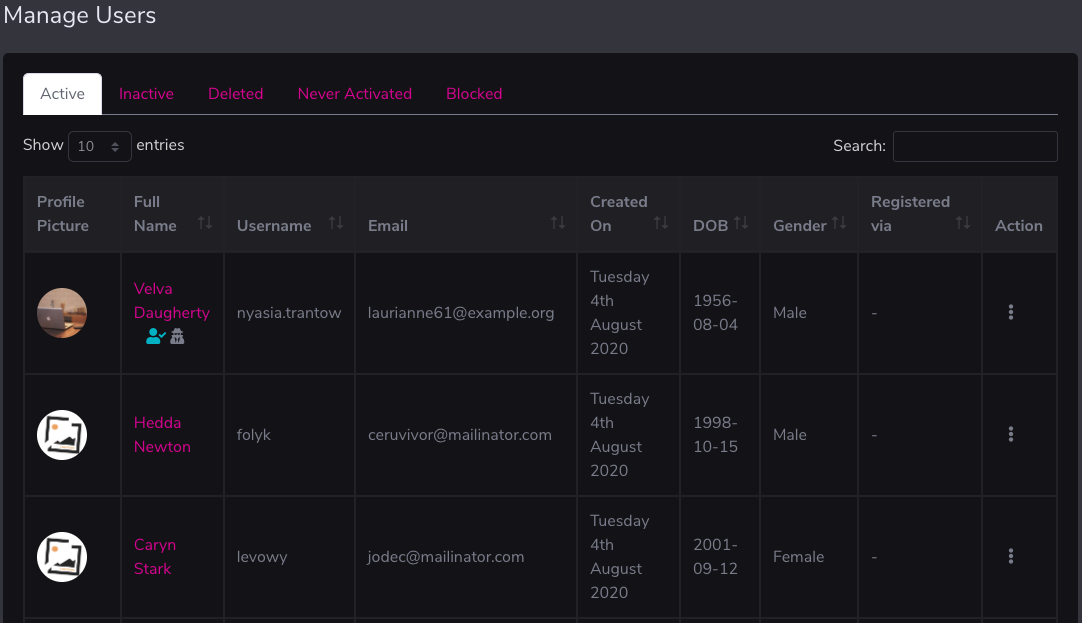
- You can Edit user by click on the Edit button, which is available for each user.
- If any user you don’t want to active anymore because of the any valid reason and want to Block that user then using this button you can
- If you Soft Delete User, it will be in deleted state and will available under Deleted tab. You can’t permanently delete that User from deleted tab or Restore User again in active tab.
- Inactive Users placed in inactive tab.
- By click on the Verify button you can mark user as verified.
- To view users financial transaction click on transaction of user.
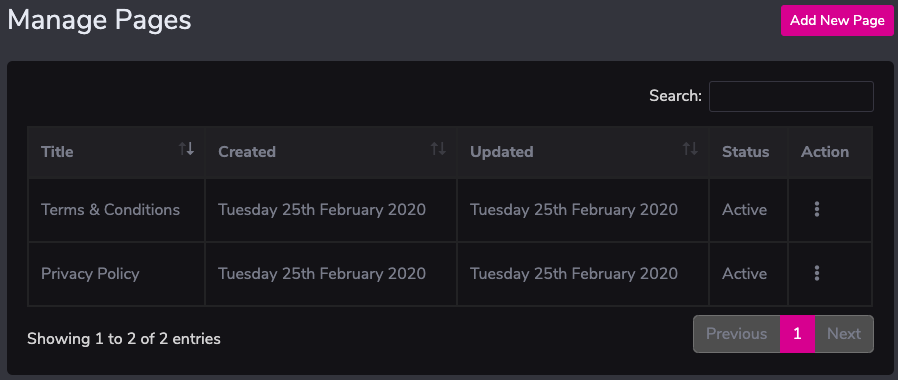
Manage Pages
Using his you will be able to manage custom pages for the site & you can use it as per you need. You can view, edit & add new pages right from here.
Add New Pages
- To add page, click on the Add New Page button.
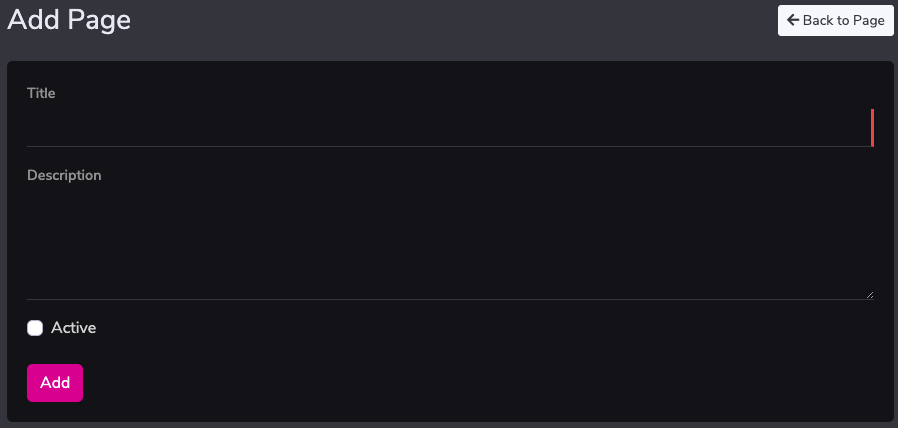
- Title – You can add Title of the Page in this field.
- Description - You can add Description of the Page right from here.
- Active/Inactive – You can decide the state of the new Page by this Switch.
- Add - On click on Add button your Page will be added.
- To edit created page, you need to click on the Edit button for the particular page, which you want to edit.
- From edit page you can copy the URL of created page to use as per your choice.
- Created custom pages can be deleted.
Manage Gifts
Using this you can manage the Gifts which is useful for users send each other. You can manage & view the all information related to the gift right from here as Add, Edit & Delete gifts.

Add New Gift
- To add page, click on the Add New Page button.
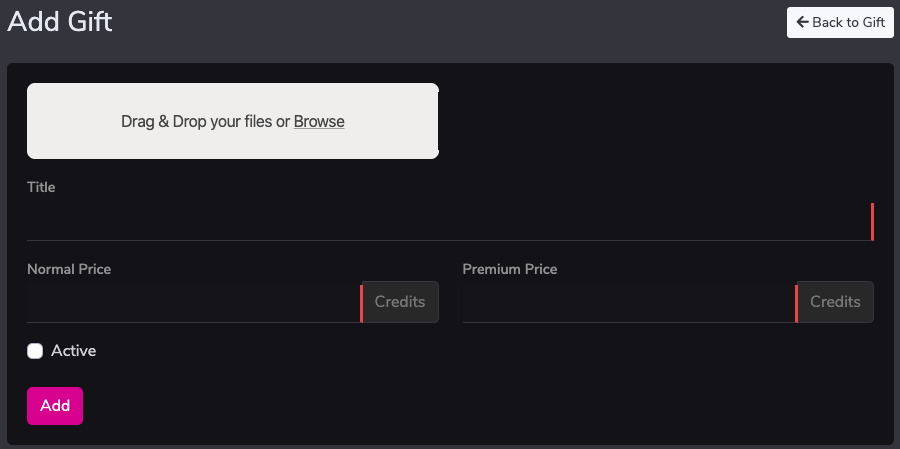
- Browse – Using this you can browse & upload the image for the gift.
- Title – You can add Title of the Gift using this field.
- Normal Price – Using this field you can set the price of the gift in credits for normal users. If you set any gift price 0 credit from here then it will be free for the normal users.
- Premium Price - Using this field you can set the price of the gift for premium users. If you set any gift price 0 credit from here then it will be free for the premium users.
- Active/Inactive – You can decide the state of the new Gift by this checkbox.
- Add - On click on Add button your Gift will be added.
- To edit created gift, you need to click on the Edit button for the particular gift, which you want to edit.
- Added gift can be deleted by click on the Delete button.
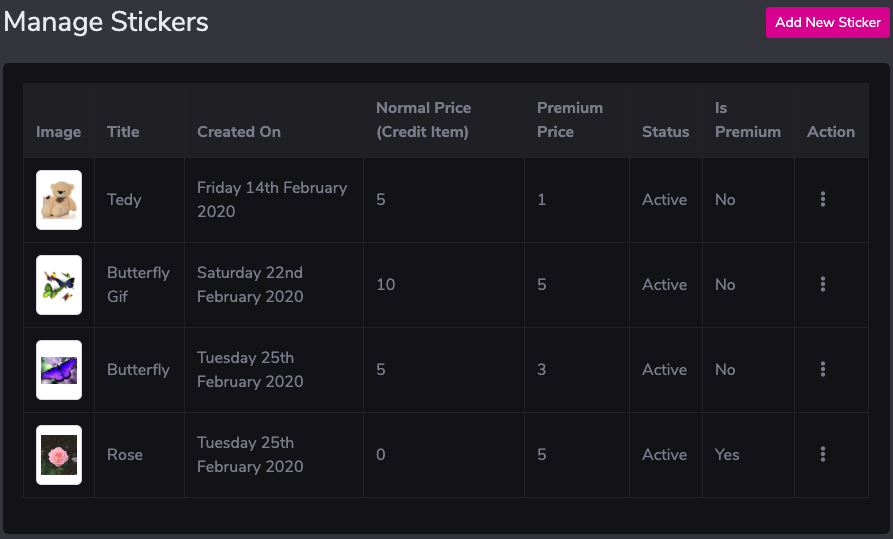
Manage Stickers
Using this you can manage the Stickers used to send each other while the chatting through the messenger. You can manage & view the all information related to the stickers right from here as Add, Edit & Delete stickers.
Add New Sticker
- To add page, click on the Add New Sticker button.
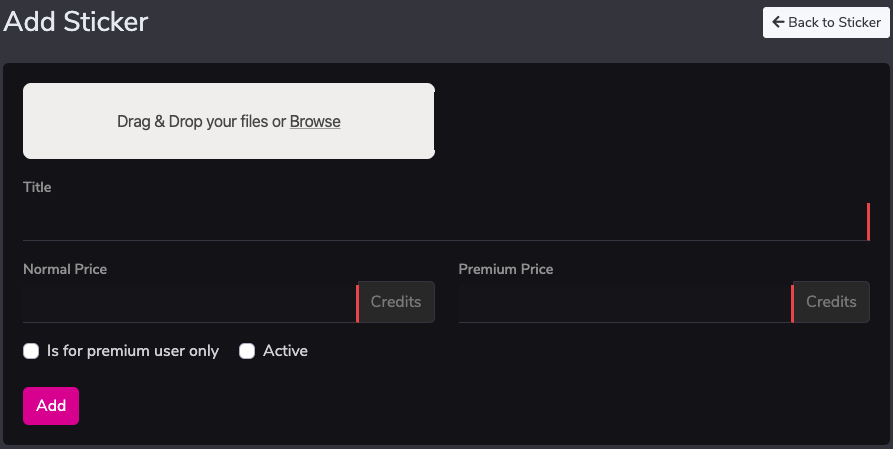
- Browse – Using this you can browse & upload the image for the sticker.
- Title – You can add Title of the Sticker using this field.
- Normal Price – Using this field you can set the price of the sticker for normal users. If you set any sticker price 0 credit from here then it will be free for the normal users.
- Premium Price - Using this field you can set the price of the sticker for premium users. If you set any sticker price 0 credit from here then it will be free for the premium users.
- Is for premium user only – If you want some stickers are only for the premium users then from here you can manage stickers only for premium users.
- Active/Inactive – You can decide the state of the new Sticker by this checkbox.
- Add - On click on Add button your Sticker will be added.
- To edit created sticker, you need to click on the Edit button for the particular sticker, which you want to edit.
- Added sticker can be deleted by click on the Delete button.
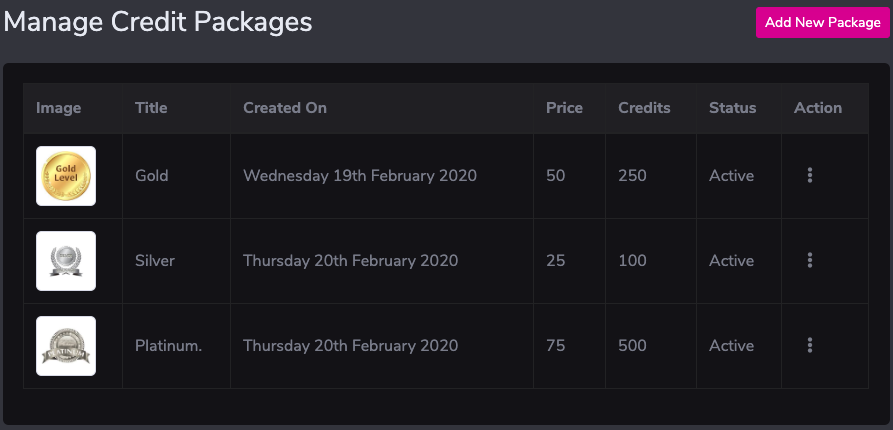
Credit Packages
Using this you can manage the credit packages for your site. You can manage & view the all information related to the credit packages right from here as Add, Edit & Delete credit packages.
Add New Credit Package
- To add new credit package, click on the Add New Package button.
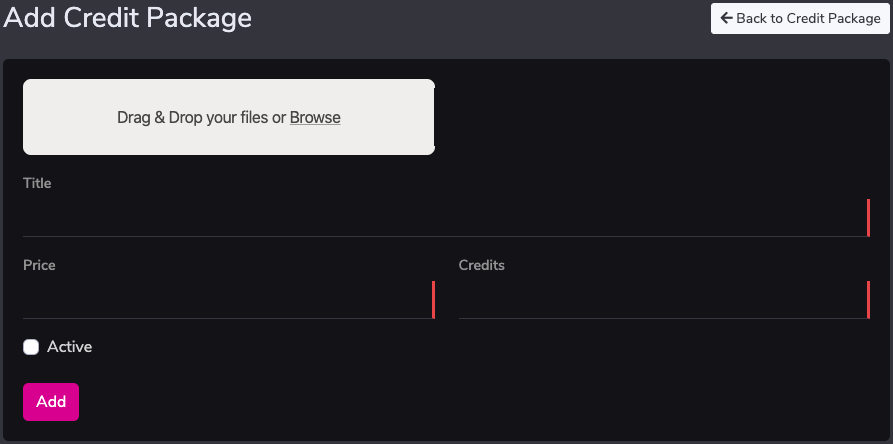
- Browse – Using this you can browse & upload the image for the credit package.
- Title – You can add Title of the credit package using this field.
- Price – Using this field you can set the price of the credit package.
- Active/Inactive – You can decide the state of the new credit package by checking this checkbox.
- Add - On click on Add button your credit package will be added.
- To edit created credit package, you need to click on the Edit button for the particular sticker, which you want to edit.
- Added credit package can be deleted by click on the Delete button.
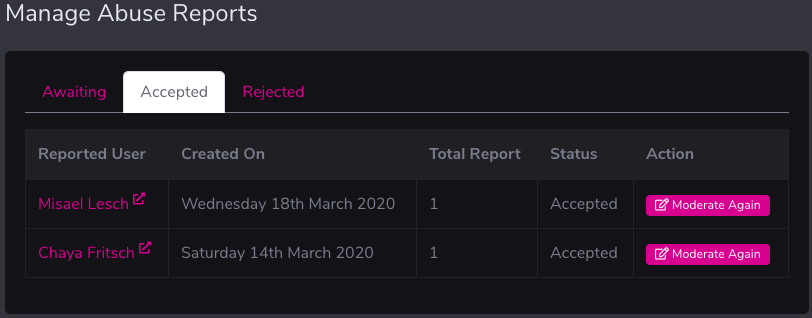
Abuse Reports
Here all abuse reports are gets collected to moderate. Using this section, you can moderate abuse reports. All abuse reports get collected as per its status i.e., Awaiting, Accepted & Rejected.
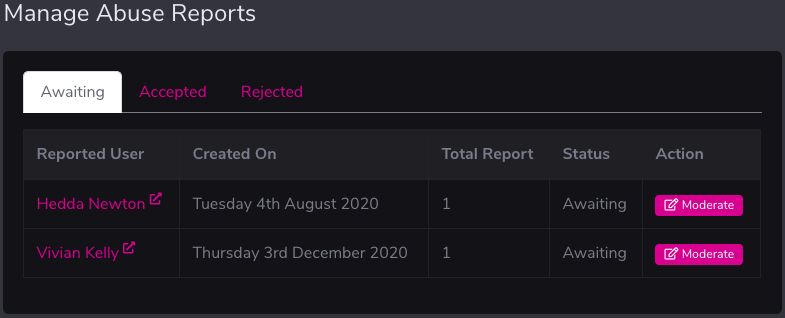
Abuse Report Moderation
- To moderate abuse report click on moderate button to moderate abuse report against any user.
- To moderate already moderated report, you can click on Moderate Again button from the tab of Accepted or Rejected reports. With moderate again admin can modify the existing moderation result of the abuse report.
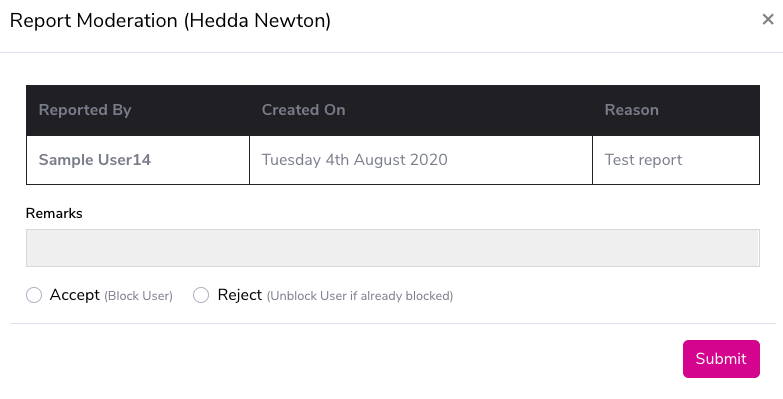
- Remark – You can add remark for abuse report moderation using this field.
- Accept – Using this radio button you can accept abuse report. If you accept abuse report for any user then that user gets blocked.
- Rejected - Using this radio button you can reject the abuse report against the user.
- Submit – By click on this button you can submit the moderation report.
- To moderate already moderated abuse report, click on Moderate Again button to again moderate abuse report against any user under Accepted & Rejected tabs. Using this you can change the moderation result of any user which are already moderated.
User Uploads
- Here all uploaded images by users are gets collected so you can manage it as admin.
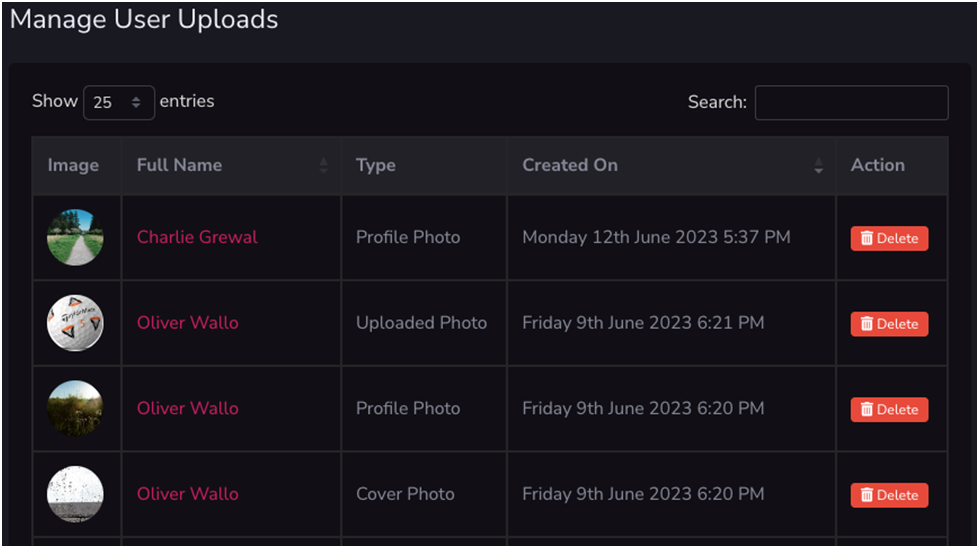
- Images/photos uploaded by users can be deleted by click on the Delete button.
Settings
This section of settings contains the number of settings to manage your site as per your requirements.
General
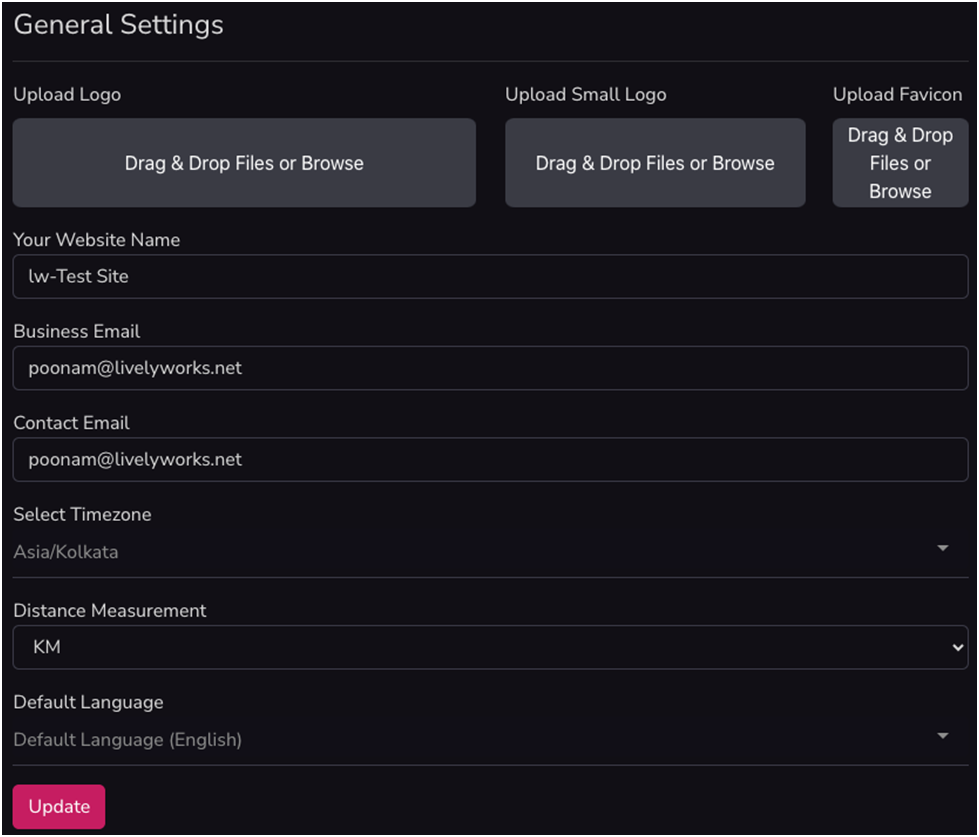
- Upload Logo – From here you can browse & upload the logo.
- Upload Small Logo – From here you can browse & upload the logo.
- Upload Favicon – From here you can browse & upload the logo.
- Your Website Name – Using this you can add your website name.
- Business Email – From here you can add your Business Email.
- Contact Email - From here you can add your Contact Email.
- Select Timezone – Time zone selected from here will be applicable for your site.
- Distance Measurement – From here you can set your Distance Measurement as Km or Miles.
- Default Language–Using this you can set your default language (By default, Default Language is English)
- Update – By click on update button your settings gets updated.
Users
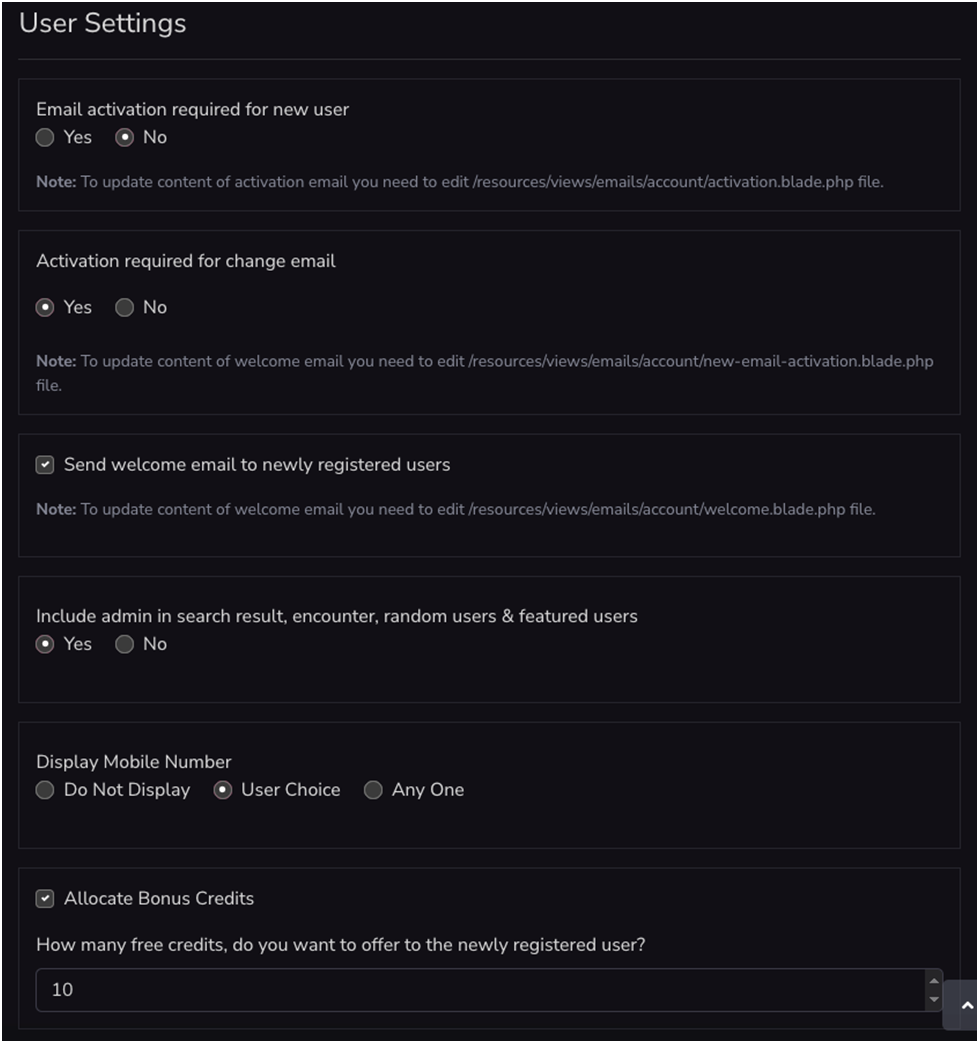
- Email activation Required for new users – If you select yes then activation for new user is required otherwise not.
- Activation Required for change email – If you select yes then activation for change email is required otherwise not.
- Send Welcome email to newly registered users – If you check this welcome email will be send to the newly registered users.
- Include admin in search result, encounter, random users & featured users – By selecting Yes, you can include admin in search result, encounter, random users & featured users otherwise admin is excluded from all above places.
- Display Mobile Number –
- If you select Do Not Display then no one can view the user’s mobile number.
- If you set it as User Choice then user can manage its own Display Mobile Number setting from My Settings.
- If you select any one then any one can view the any one’s mobile number.
- Allocate Bonus Credit – By checking this you can allocate credit bonus to the new registered users.
- No. of Credits – From here you can add no. of credits to allocate credit bonus.
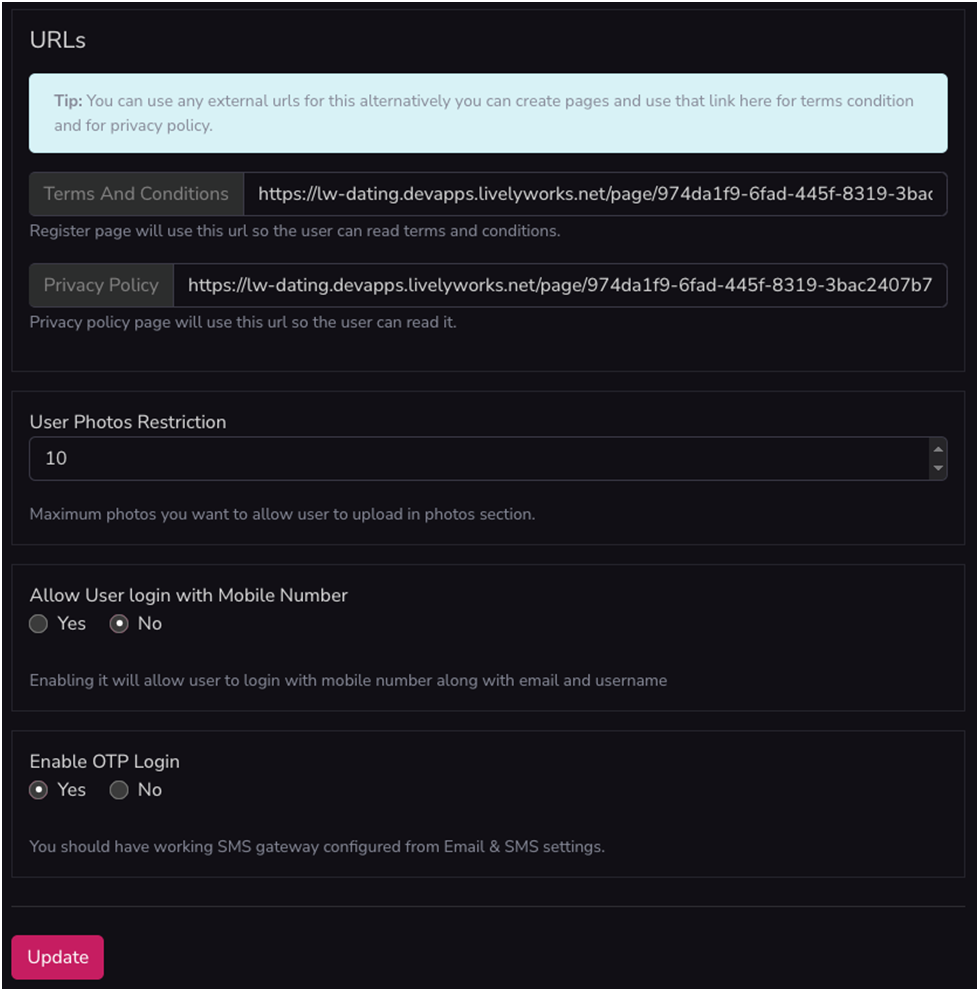
- URL
- Terms and Conditions–From here you can add URL to show the terms & conditions while user registration. To copy this URL first you have to create the page from Pages section & copy that created page URL from edit page.
- Privacy Policy - From here you can add URL to show the privacy policy while user registration. To copy this URL first you have to create the page from Pages section & copy that created page URL from edit page.
- User Photos Restriction – From here you can set the restrictions for the user’s photo upload at My Photos.
- Allow User login with Mobile Number – If you select yes then user can login with registered Mobile Number otherwise not.
- Enable OTP Login -If you select yes then user can login with OTP. This OTP will be received to the user via email or SMS. Make sure you have added valid SMS provider details.
- Update – By click on update button your settings get updated.
Currency
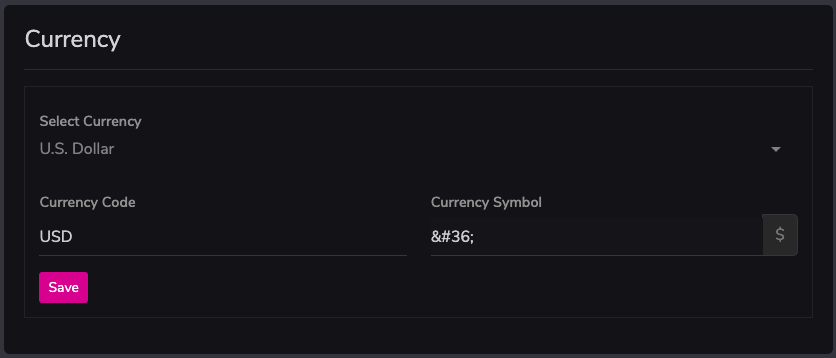
- Select Currency – From here you select & set your preferred currency.
- Save - By click on save button your currency settings gets saved.
Payment Gateways
From here you can set your payment gateways PayPal, Stripe and Razorpay.
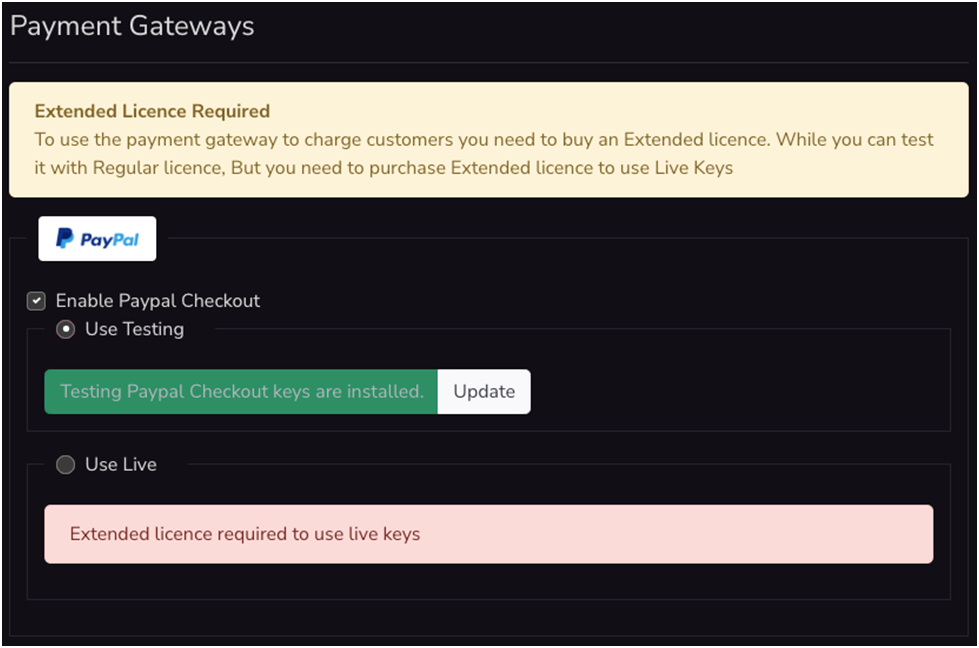
- Enable PayPal Checkout – Using this you can enable PayPal Checkout for your site.
- Use Testing/Live – By selecting any one from this you can set the keys for PayPal Checkout for Testing/Live mode.
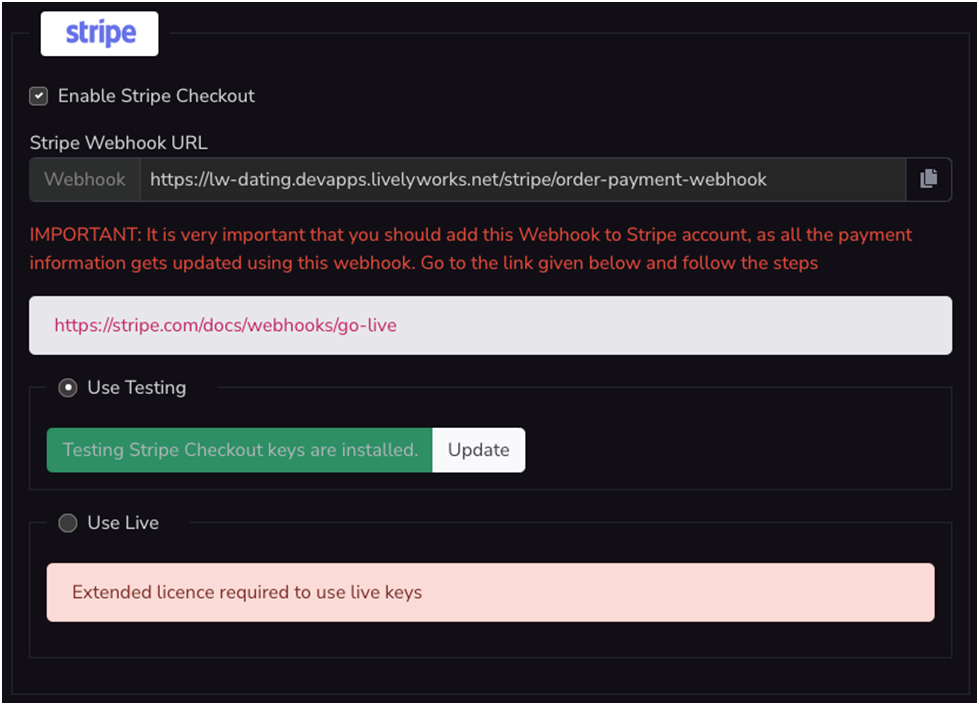
- Enable Stripe Checkout – Using this you can enable Stripe Checkout for your site.
- Use Testing/Live - By selecting any one from this you can set the keys for Stripe Checkout for Testing/Live mode.
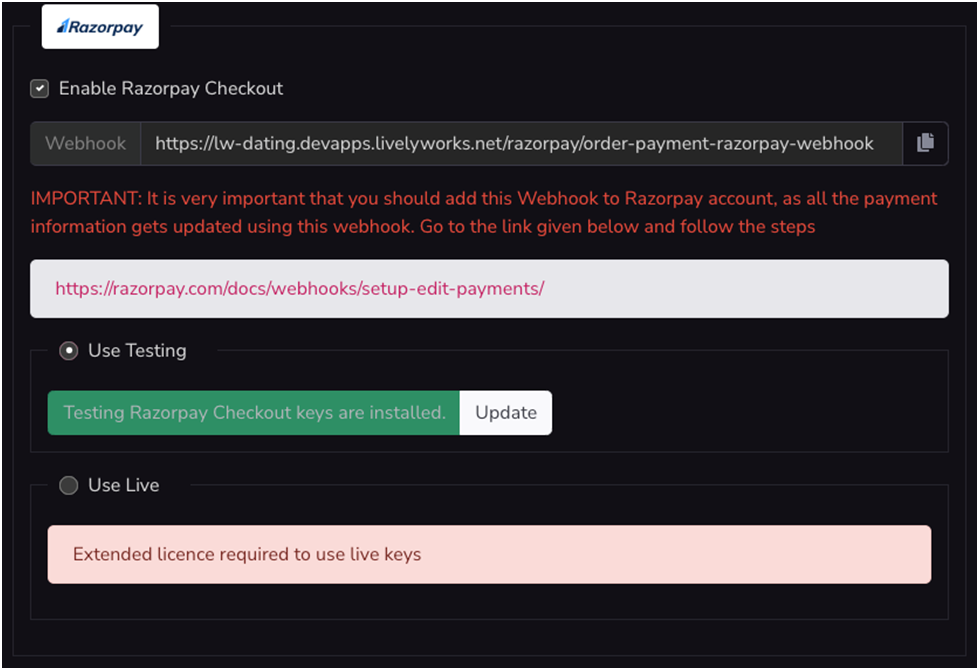
- Enable Razorpay – Using this you can enable Razorpay for your site.
- Use Testing/Live - By selecting any one from this you can set the keys for Razorpay for Testing/Live mode.
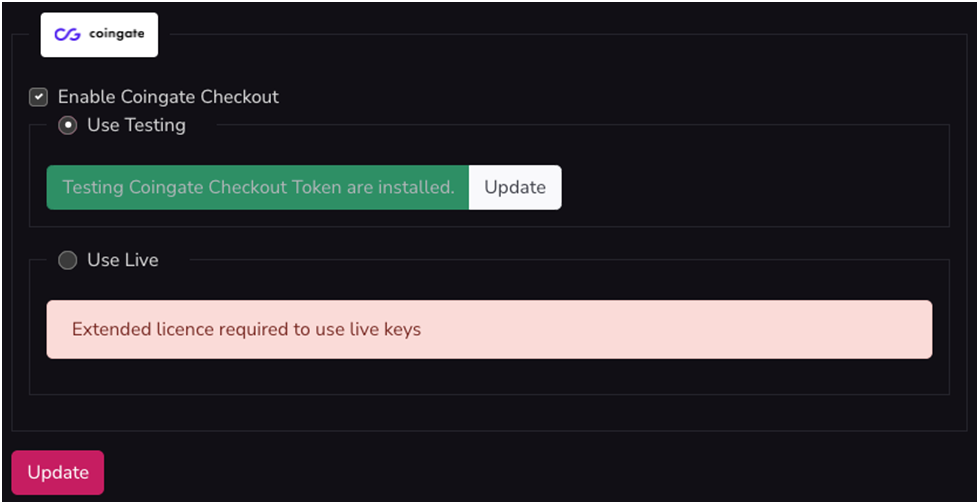
- Enable Coingate – Using this you can enable cryptocurrency gateway Coingate for your site.
- Use Testing/Live - By selecting any one from this you can set the keys for Coingate for Testing/Live mode.
- Update – By click on update button your settings get updated.
- Please Note – To use live keys of all payment gateways you need to purchase Extended licence and to set Live Keys you must have to add your product purchase code and other required information under Licence Verification section.
Social Logins
From here you can manage your social login settings.
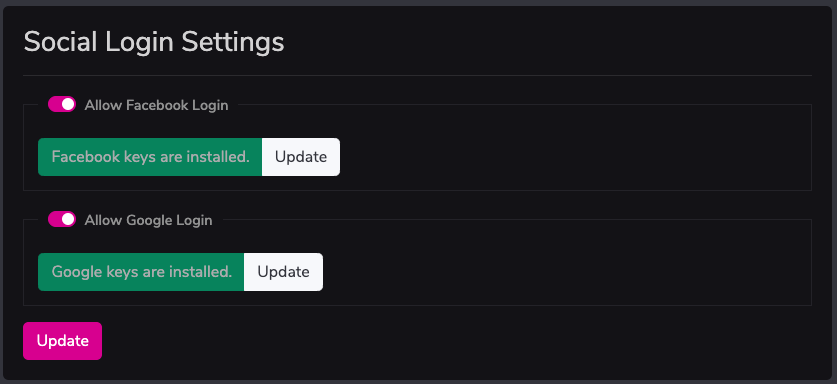
- Allow Facebook/Google Login – Using this you can enable/disable both social login & set keys for both.
- Update – By click on update button your settings get updated.
Integrations
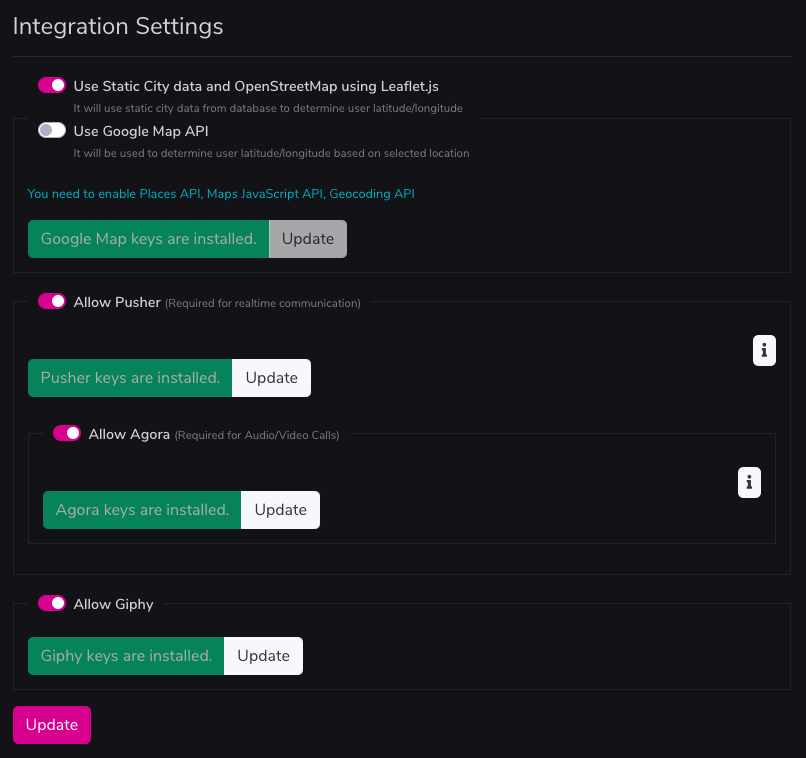
- Location Map
- Use OpenStreetMap - By enabling this location will be displayed on the page using OpenStreetMap.
- Use Google Map - By enabling this location will be displayed on the page using free Google Map Embed.
- Location Search
- Use Static location database - By enabling this you can use static city data from database to determine user latitude/longitude.
Please don’t forget to run/import data from static-locations.sql file available in the package.
- Use Google Map API - From here you can enable Google MapAPI and set Google Map key for determine user latitude/longitude based on selected location.
Please note that you need to enable Places API, Maps JavaScript API and Geocoding API.
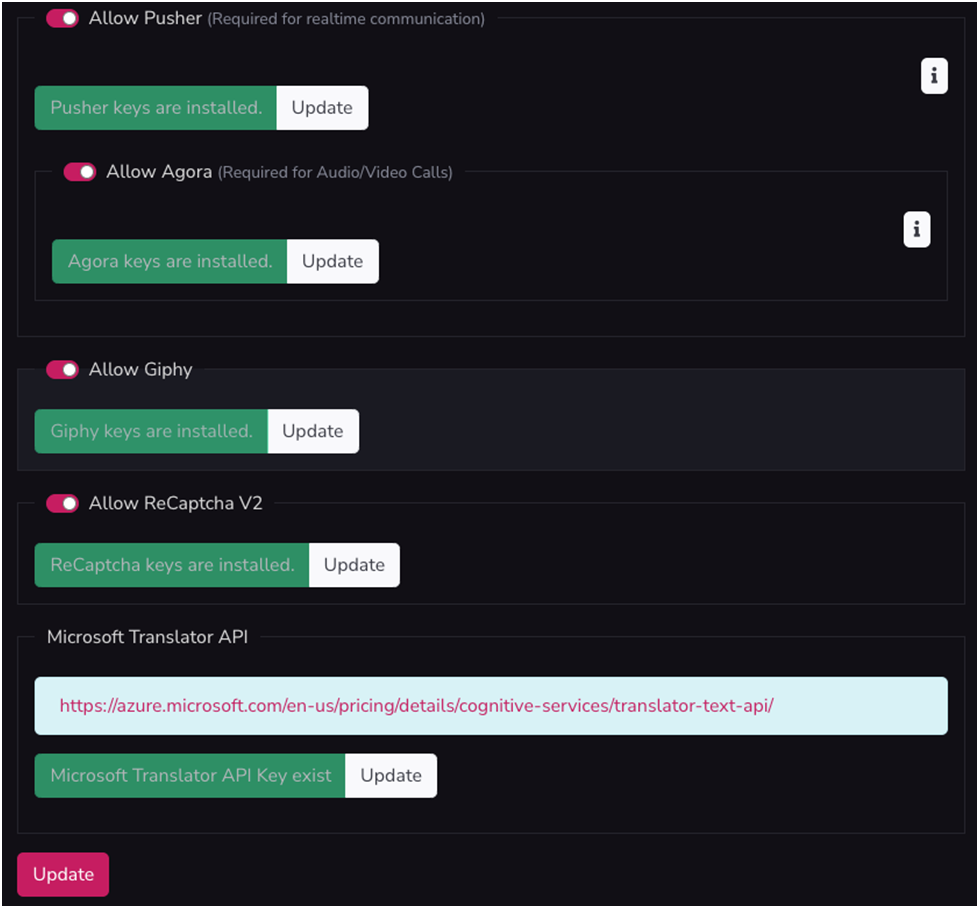
- Allow Pusher - From here you can manage enable/disable pusher integration and set keys for pusher notificationsi.e required for realtime communication.
- Allow Agora - From here you can manage enable/disable Agora settings and set keys for it which is required for the Audio & Video calls.
- Allow Giphy - From here you can manage enable/disable Giphy settings and set key for it which required for the send Gif images via messenger.
- Allow ReCaptcha V2 – From here you can manage enable/disable settings for the ReCaptcha and set keys for it which is required for the use ReCaptcha on various pages like contact, login with OTP page etc.
- Microsoft Translator API -From here you can add and set Microsoft Translator APIkey for auto translation of language while adding any new language.
- Update – By click on update button your settings get updated.
Premium Plans
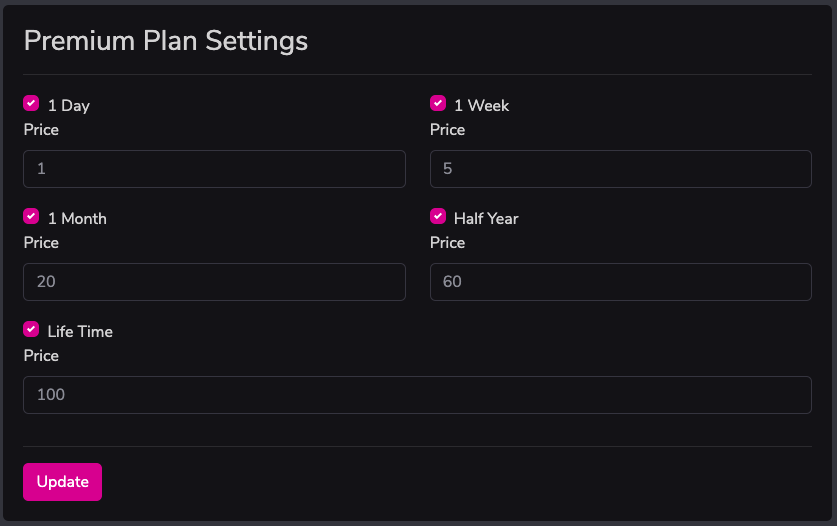
- From here enable required duration of premium plan & set it’s price in credits as per your choice.
Features
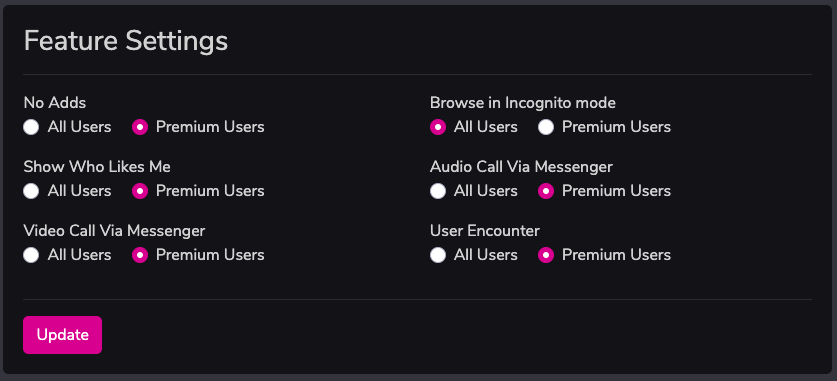
- From this setting you can manage your features settings as per given.
- If you select All users then feature is applicable for all users or if you select Premium Users then that feature is for the premium users only.
- Update – By click on update button your settings get updated.
Email& SMS
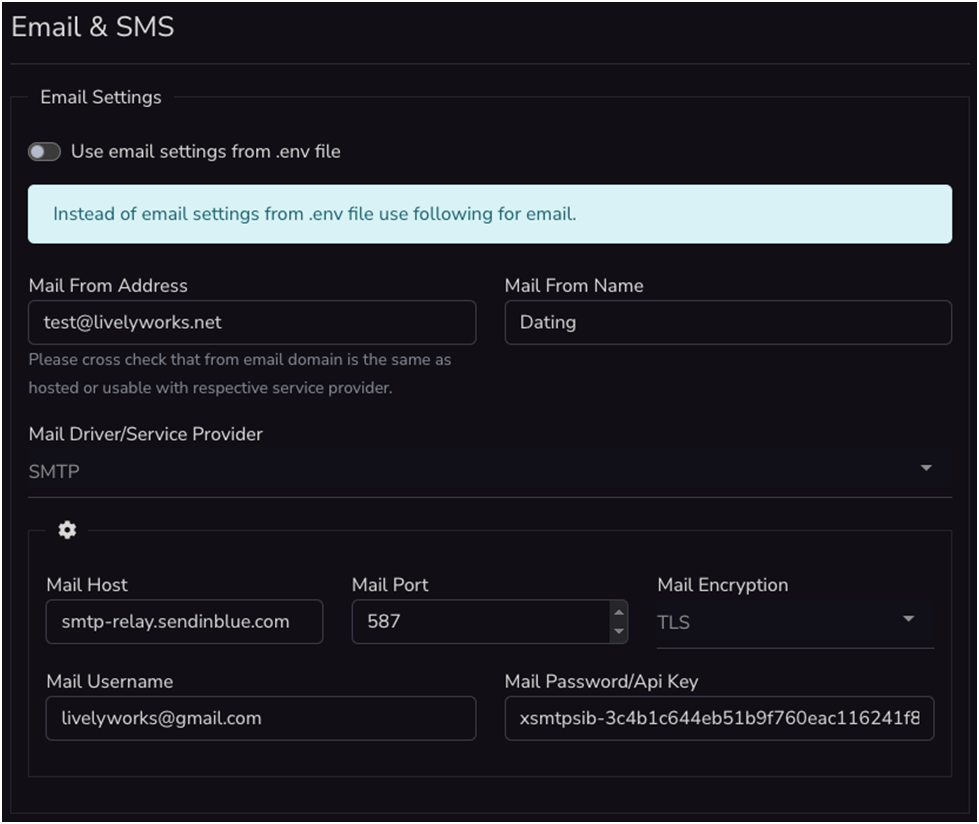
- Use email settings from .env file – If this setting is enabled then it will take email settings details from .env file to send emails. By default .env settings are enable.
- If you disable .env setting then you have to select following to manage email settings.
- Mail From Address – From here you can add your mail from addresswhich is common for the all MailDriver/Service Provider.
- Mail From Name - You can add your from name from here which is common for the all MailDriver/Service Provider.
- Mail Driver/Service Provider– Using this you can select your mail driver for sending emails and as per selected mail driver you have to set required information to set Mail Driver/Service Provider.
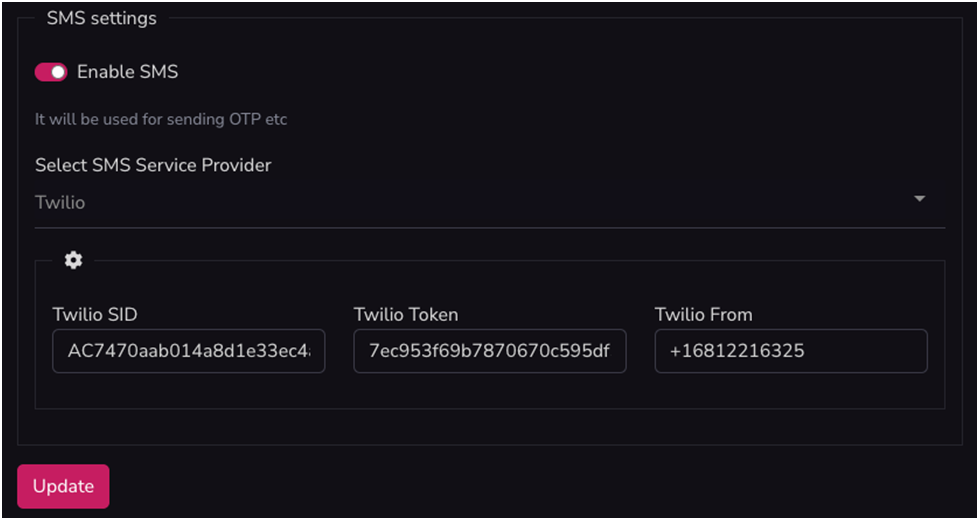
- Enable SMS - By enabling this you can use SMS service which will be used for sending OTP etc.
- Select SMS Service Provider – From here you can select SMS Service Provider as per your choice.
- As per selected Service Provider you have to set required information to useservice of selected SMS Service Provider to send SMS.
- Update – By click on update button your settings get updated.
Booster
From here you can manage your Booster settings.
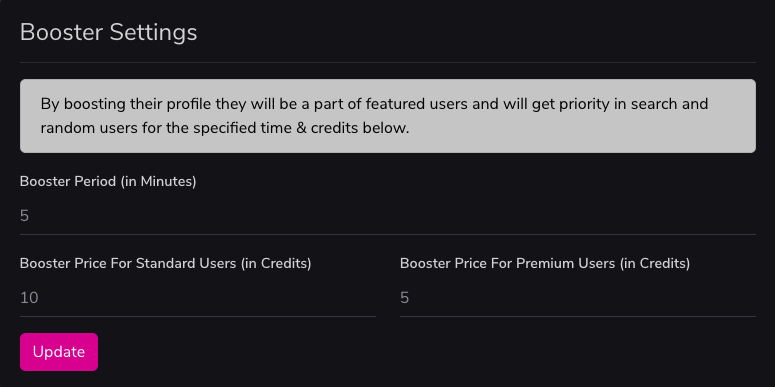
- Using this you can manage your profile booster by setting the booster period & its price in credits for normal and premium users.
- Update – By click on update button your settings get updated.
Advertisement
From here you can manage your Advertisement settings.
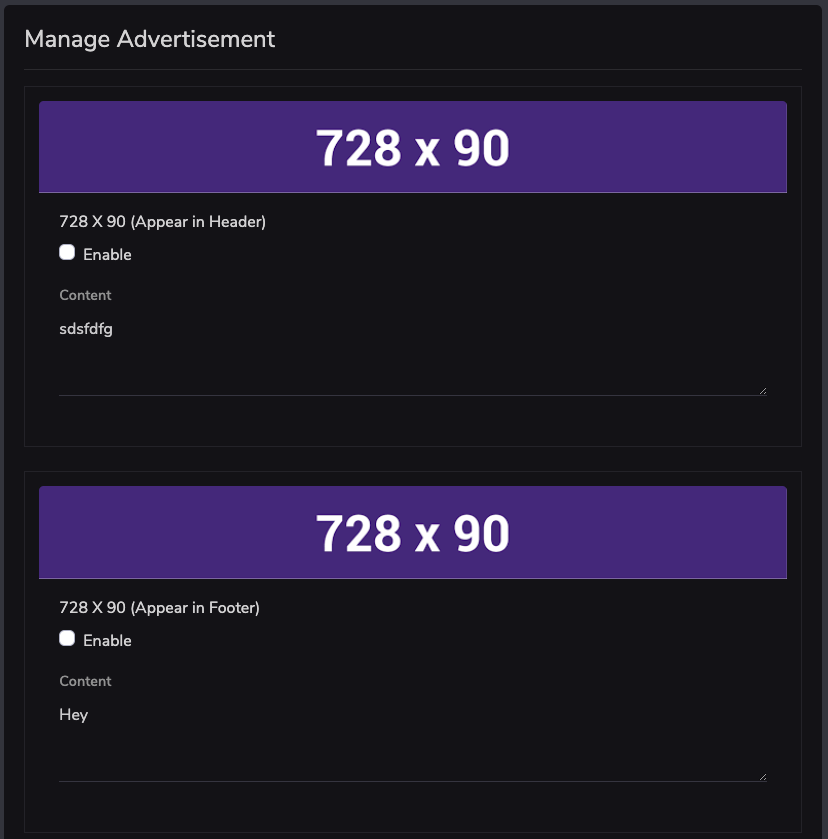
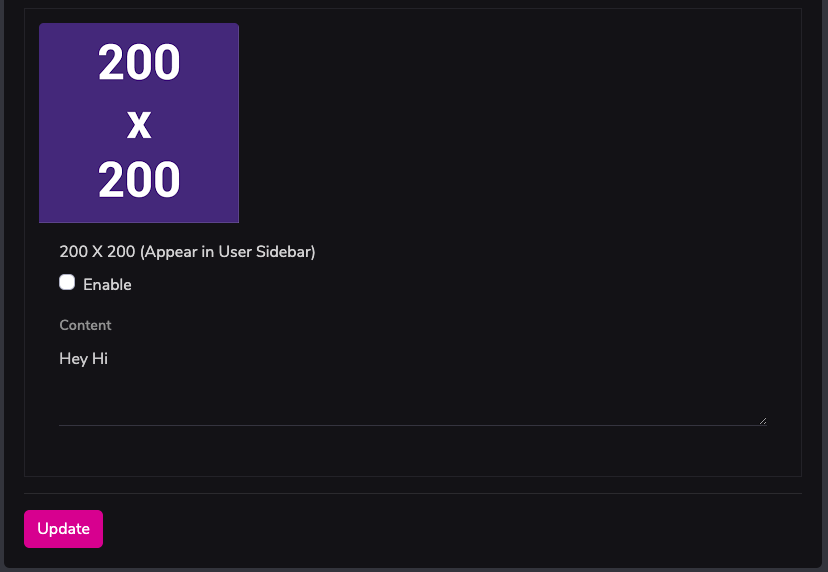
- Using this setting, you can manage your advertisement in header, footer &sidebar. by enabling each advertisement section.
- Update – By click on update button your settings get updated.
- Enable–By enabling each advertisement section you can enable the advertise for header, footer or sidebar.
- Content–From here you can add content for each advertisement section separately.
Custom Profile Field
From here you can manage Custom Profile Fields as per your need.
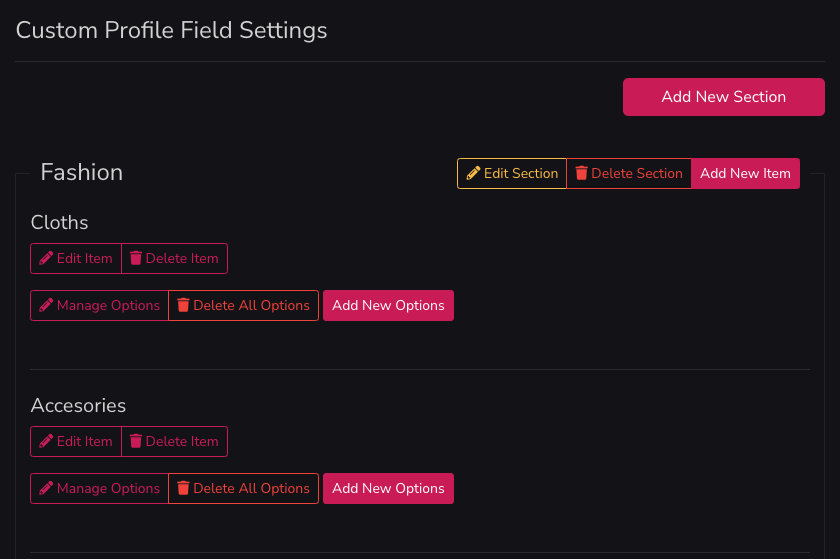
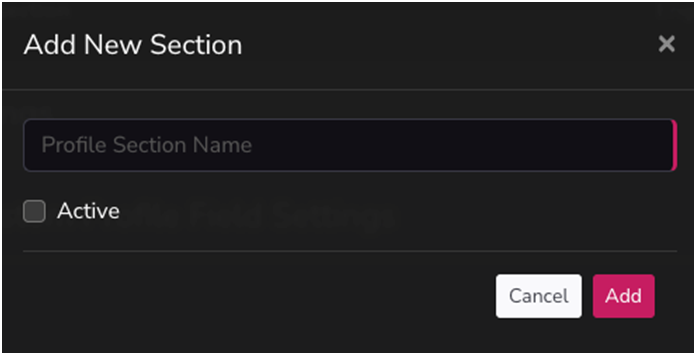
- Add New Section – From here you can add new section.
- Profile Section Name – From here you can addprofile section name.
- Active – Using this you Chance status of section Active/Inactive.
- ADD – Click on ADD button to add new section by adding all above information.
- Edit Section – From here You can edit all information of added section.
- Delete Section - From here You can delete added section.
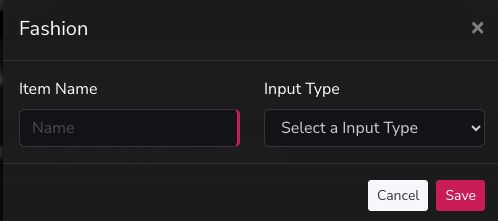
- Add New Item -From here you can add new item under addedprofile section.
- Item Name – From here you can additem name to add new item.
- Input Type – From here you can select Input Type ofitemto add new item
- Save – Using this you can save new item.
- Edit Item – From here You can edit all information of added item.
- Delete Item - From here You can delete added item.
- Add New Options– By click on this button form for add new option will open to add new option.
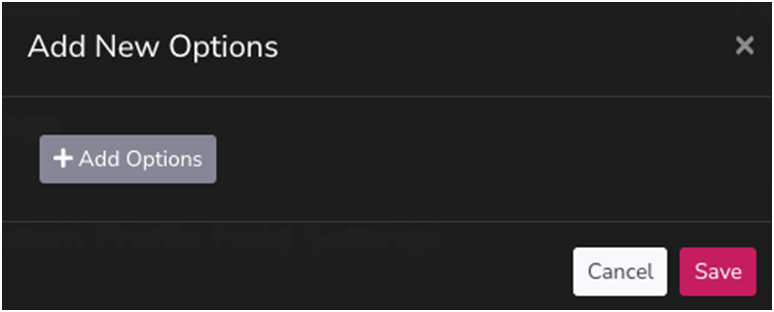
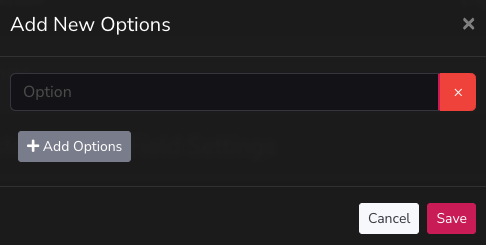
- Add Options – By click on this button field for add new option will open on add new option form. You can add multiple options on same form by click on same button & open multiple fields to add options.
- Option – Here you can add new option name which you need to add. Also, you can delete single added option from here.
- Save - By click on this button your option will be saved.
- Manage Options – By click on this button you can open the form to manage options.
- From here you edit added options.
- Also, you can delete added single options from here.
- Update - By click on this button you can update changes done on edit options form.
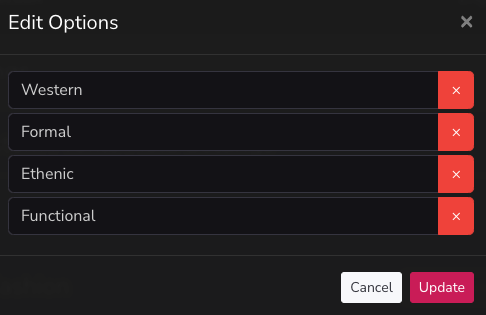
- Delete All Options –By click on thisyou can delete all added options on one click.
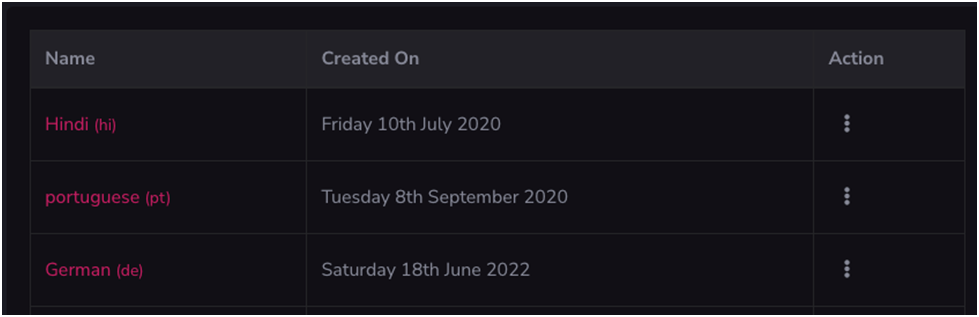
Languages
Using this section, you can manage your languages & its translations as per each language. You can add, edit& delete languages from here. To add new language, you have to add its Name, valid language code, mention if it is RTL language & click on Save, to save language.
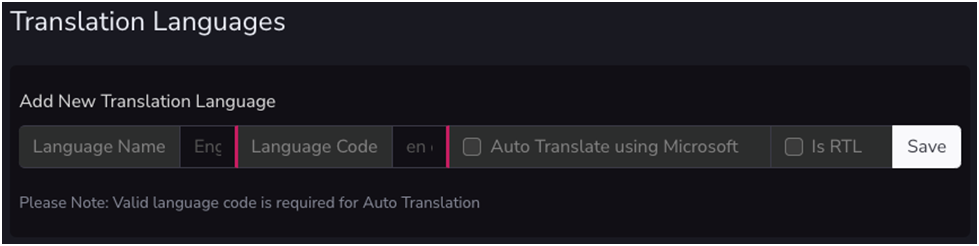
Add New Translation Language
- To add new language, you have to add all required information related to that language and save that language.
- Language Name –From here you can add new translation language.
- Language Code – Using this you can add language code for the translation language.
- Auto Translate using Microsoft – If you check this checkbox while adding new language then then all strings of the system are gets translated while creating the new language. You don’t need to translate it separately.
- Is RTL – Using this checkbox you decide that whether this language is RLT or not.
- Save –By adding all information to add new translation language and click on save this Save button new language will be added.
- By click on the language name you can manage the particular language translation using Auto translations or Microsoft Translator.
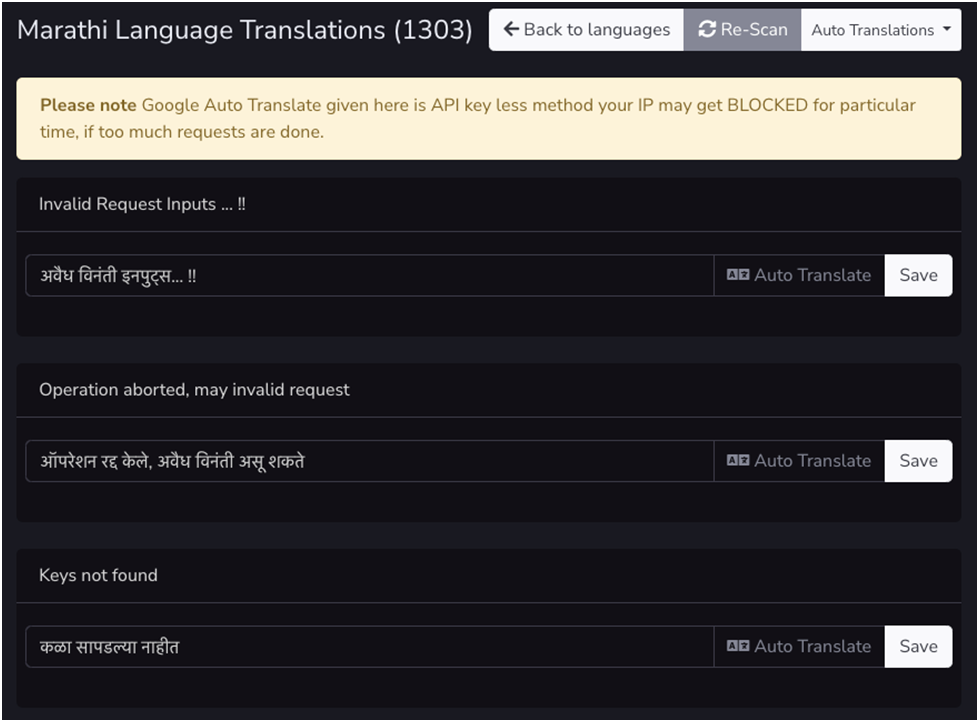
- Re-scan – Using this you can get more added strings for translation.
- Auto Translations – It contains two options to auto translate the any language one is Microsoft Translator & another is Auto translations (Google Spreadsheet)
- Microsoft Translator - Using this you can auto translate all strings at a time using Microsoft Translator.
- Auto translations (Google Spreadsheet) – Using this you can auto translate all strings using Google Spreadsheet just by exporting & importing the sheet. When you click on Auto translations (Google Spreadsheet) then you will get the all information regarding how to create it.
- Auto Translate - Auto Translate given in front each string to Auto Translate each string. But for this you need to translate each string separately & manually.
- Save – You can use Save button to save the auto translated single string.
Generate Fake Users
Using this section, you can generate fake users for initial launching of your site.
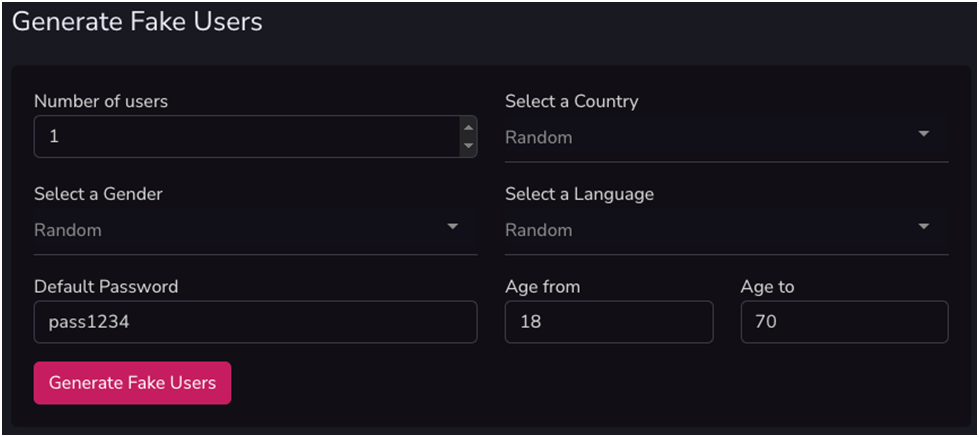
- To generate fake users, you need to add information the fields shown in above image as per your requirements.
- This will you provide you the fake users with complete information in there profile as per your selection in the above form.
Fake User Messenger
From here you can communicate on behalf of fake user.
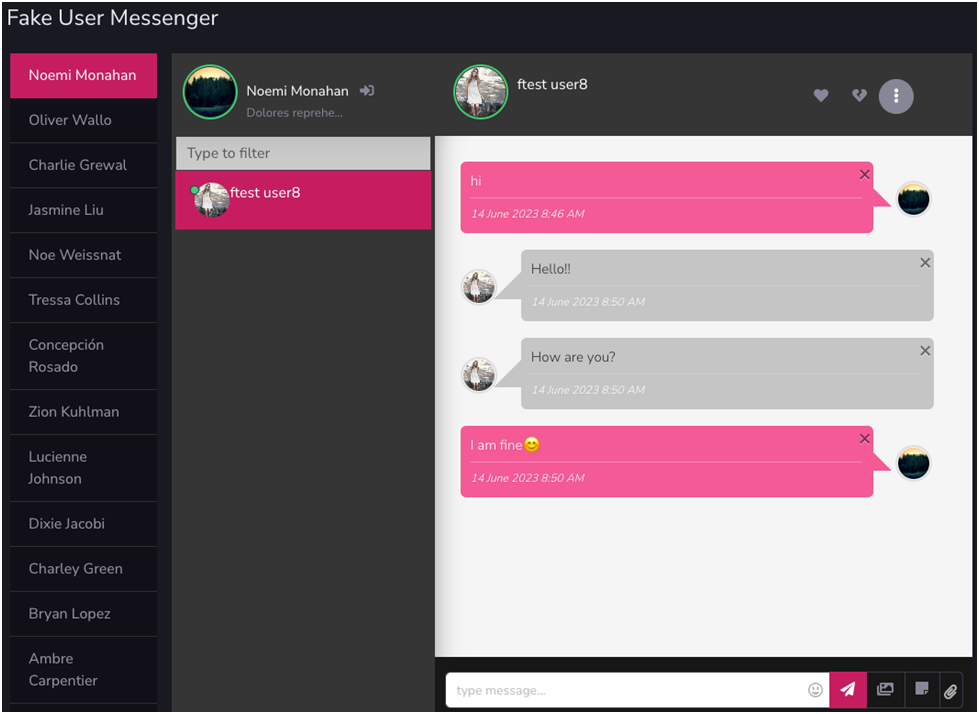
All the fake user to whom any another user initiate communication or vise versa will be listed here.
You can like/dislike on behalf of fake user
Also, admin can login from here as respective fake user.
Clear System Cache
Using this or by click on this link you can clear the system cache on click for your site. Like Database, View cache etc
Thank You
This information would help you to customize understand application better
Once again thank you so much for purchasing this product. I would be glad to help you if you have any questions relating to this product. No guarantees, but I will do my best to assist.
We have small team of Designer & Developers, here are some of the Great tools and technologies we use day2day for the development: HTML5, CSS3, jQuery, PHP, Laravel, AngularJS etc.
we also build iOS & Android Application.
If you need any Customization Work / Support on this Product or having any project for us. Please feel free to email us at [email protected]