ServePHP
Manage Server
Manage Server
Creating Server on DigitalOcean
-
For creating the server with Digital Ocean the primary requirement is to setup the server provider.
-
To setup the server provider connection, click on Manage from top menu & then on Server Providers.
-
Then click on the Setup New Server Provider Connection button.
-
Select server provider as per your choice (Currently available DigitalOcean only).
-
Then add title of your server provider.
-
Click on the Connect button, now your server provider is connected & shows in the list.
-
-
Once you setup the server provider then you can create the server by clicking on the Server from top menu.
-
After that click on the Digital Ocean Droplet to create new server on DigitalOcean.
-
Enter Name of your server then select Provider, Provision As, Server Size, Server Region, PHP Version & Database one by one.
-
To create server with selected credentials click on the Submit button.
-
You may also connect to the provisioned server or can provision the new custom server.

Connecting fresh Ubuntu Server
-
For connecting the fresh Ubuntu server to ServePHP first you have the fresh Ubuntu 18.04 x64 server. Here we are using the DigitalOcean Ubuntu server.
-
Then to connect with the already created server you have to run the following command on terminal as ssh root@IpAddress (At the place of IP Address use the actual IP Address of fresh created Ubuntu server on DigitalOcean) & click on the Enter button.
-
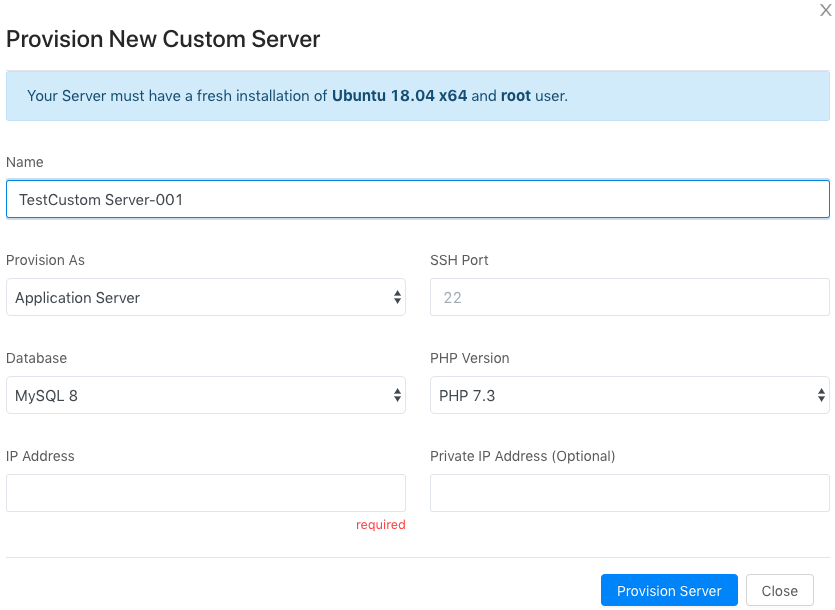
Now to connect the Ubuntu server with ServePHP click on the Custom server from ServePHP which opens the dialog as Provision New Custom Server.
-
First add the Name of the server.
-
Then select Provision As, add SSH Port, select Database & PHP Version.
-
At last add IP Address of Ubuntu server & click on the Provision Server button.
-
After click on the Provision Server button your custom server provisioning will gets starts & also it will show you the one command.
-
Now you have to login with root user account on terminal & copy the above given command & paste it on the terminal.
-
After few minutes your Ubuntu server is connected with the ServePHP.
-
SSH Keys
-
The SSH Key can be used to login to your server without a password.
-
Each user inside server can have multiple SSH keys attached to them. For ex. if you want a team member to be able to login to your server under username servephp, just add another SSH public key to the server. After that, the team member can login to your server without any password.
-
If you do not have any SSH key pair inside your computer, then just issue ssh-keygen inside terminal (Linux & MacOS).
-
On Windows you can use the git bash to generate SSH key.
-
Then you can get the SSH public key by issuing cat ~/.ssh/id_rsa.pub which you can register inside ServePHP.
-
You can install new SSH Key for the server by clicking on the SSH Keys from settings of the server.
-
If you don't install the new SSH Keys for the server then server uses the default SSH Key which is automatically installed on every server while provisioning.
-
You can install new SSH Keys using the following, you just need to add the Name of key & Key.
-
Deleting the SSH Key will remove the key from the server.

-
Cron Jobs
-
Cron is a time based job scheduler. The use of cron is to schedule the jobs to run periodically at fixed times or intervals.
-
You can set the certain command to cron job, it will honour time that you have set & will run the command according to time.
-
For scheduling the Cron Job for any command you need to click on the Add New Cron Job which opens the form like follows.


-
To schedule new cron job you need to first add the command to ron the cron job.
-
Then you can add your user.
-
After that you can select the Common Setting from the given settings or you can create your customized settings as per your choice.
-
At last click on the Submit button.
-
If you are no longer using any cron jobs, you can click the delete button to delete that job which you want. It will never impact on any other cron job.
-
PHP Settings
-
You can manage settings of PHP files using this PHP Settings.

-
Using the Post Max Size you can set the maximum size of file for POST data.
-
You can set the maximum file upload size from Max File Upload Size.
-
From the Memory Limit you are able to set the memory limit of php file.
-
Also you can edit the PHP FPM configuration by the on the Edit PHP FPM Configuration button on PHP page.

-
To save the changes click on the Submit button on Edit PHP FPM Configuration dialog.
-
By clicking on the Edit PHP CLI Configuration button on PHP page you can edit the PHP CLI configuration.

-
To save the changes click on the Submit button on Edit PHP CLI Configuration dialog.
-
Firewall
-
To manage firewall rules click on the Firewall from server side menu which opens the firewall page with to add new firewall rule & view the existing firewall rules.
-
To add new firewall rule first you need to add the Name of the new rule.

-
Then you have to add the Port/Service for new rule.
-
After that select the Rule Allow/Deny. At last you can add the IP Address & IP Address To which is optional.

-
Also you are able to delete some existing firewall rules.
-
Process Supervisor
-
Under process supervisor you can add the supervisor job for the process.
-
To add the new supervisor job for the process click on the New Supervisor Process Job button which opens the dialog to add new job.

-
To add new supervisor job first you have to add Command & then Directory (Which is optional).
-
Then you have to add User & Number of Processes.
-
Finally to create the supervisor job click on the Create button.