WhatsJet SaaS
Setup Guide
Setup Guide
Getting Started
Once you downloaded &installed the system now you need to setup it so it can work for you.
Suppose you have installed it at https://yourdomain.com now you need to login to the system as SuperAdmin using the credentials given in creds.txt file.
Once you get logged into the system successfully you need to configure as per your needs.
Configuration
This section of settings contains the number of settings to manage your site as per your requirements.
General Settings
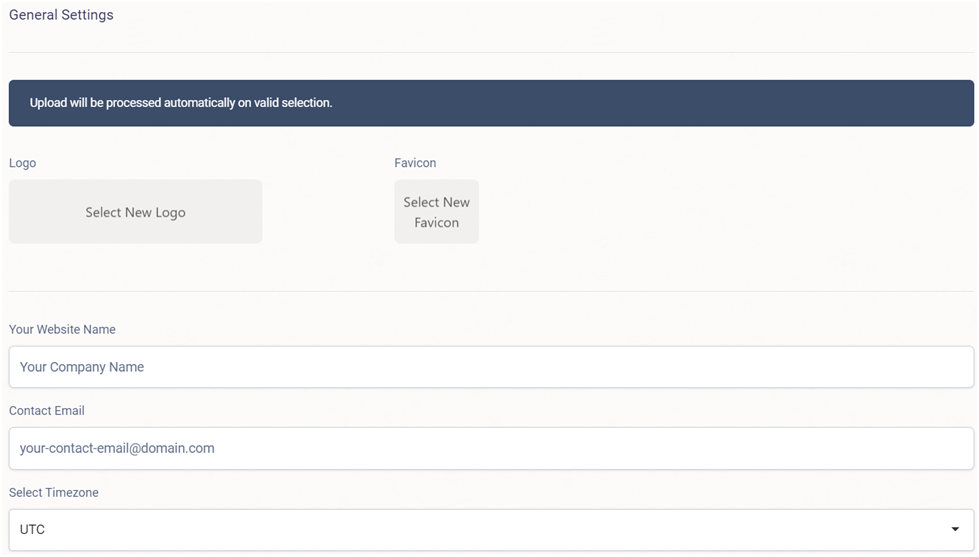

- Logo – From here you can browse & upload the logo.
- Favicon – From here you can browse & upload the logo.
- Your Website Name – Using this you can add your website name.
- Contact Email - From here you can add your Contact Email.
- Select Time zone – Time zone selected from here will be applicable for your site.
- Default Language – Using this you can set your default language (By default, Default Language is English)
- Save – By click on save button your settings get saved.
User & Vendor Settings
From here you can set user related settings.
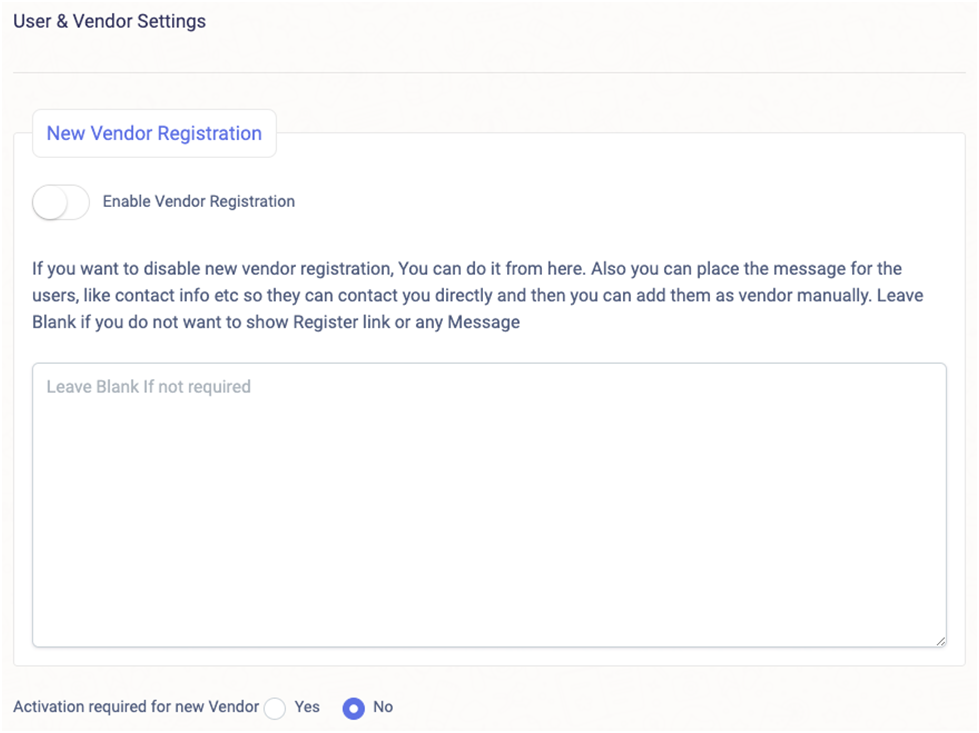
- New Vendor Registration – From here you can manage new vendor registrations.
- Enable Vendor Registration – You can enable/disable vendor registration using this. If you want to disable new vendor registration, you can do it from here. Also, you can place the message for the users, like contact info etc. so they can contact you directly and then you can add them as vendor manually using area given after this to write the information. Leave Blank if you do not want to show Register link or any Message.
- Activation Required for new users – If you select yes then activation for new user is required otherwise not.
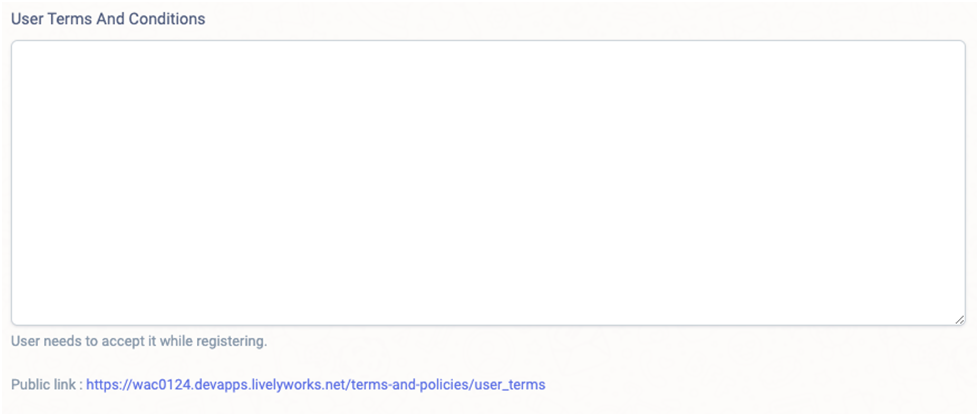
- User Terms and Conditions – From here you can add user terms & conditions which is shown while vendor registration to accept it before vendor registration. Using public link, you can place it anywhere as per your need or you can use it as per your need.
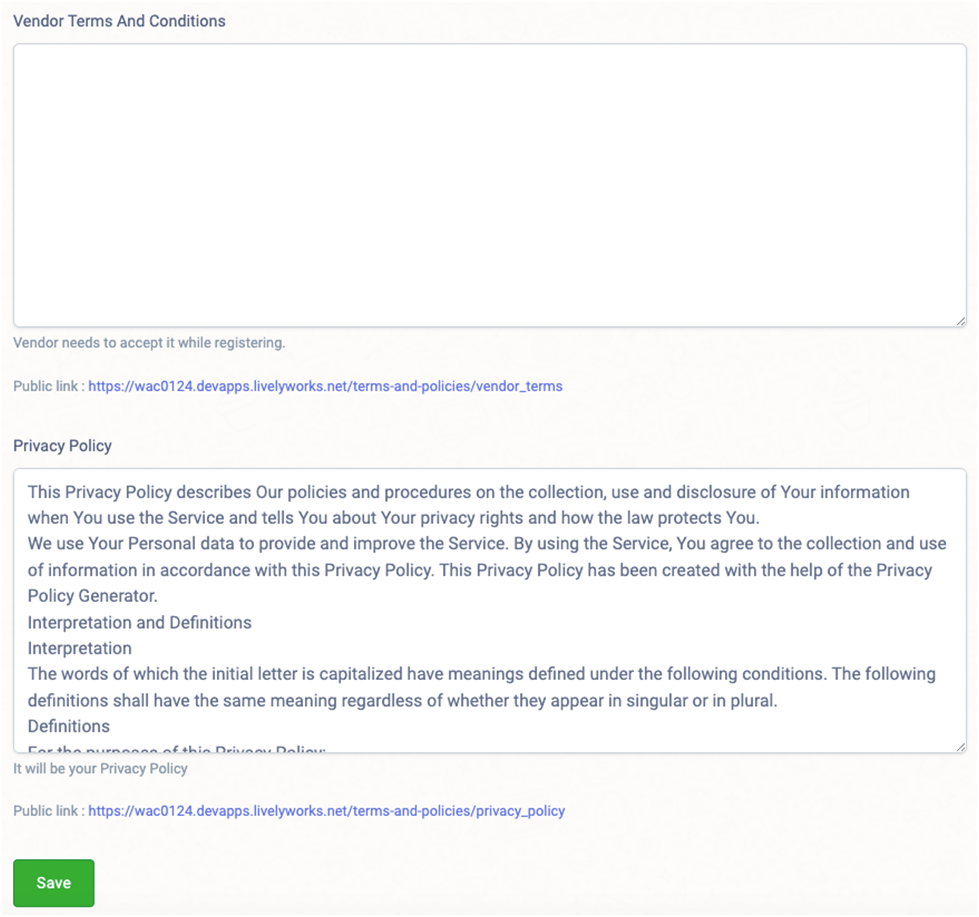
- Vendor Terms and Conditions – From here you can add vendor terms & conditions which is shown while vendor registration to accept it before vendor registration to create vendor account.Using public link, you can place it anywhere as per your need or you can use it as per your need.
- Privacy Policy - From here you can add privacy policy for the system to accept before vendor registration.Using public link, you can place it anywhere as per your need or you can use it as per your need.
- Save – By click on update button your settings get saved.
Currency Settings
From here you can set your currency.
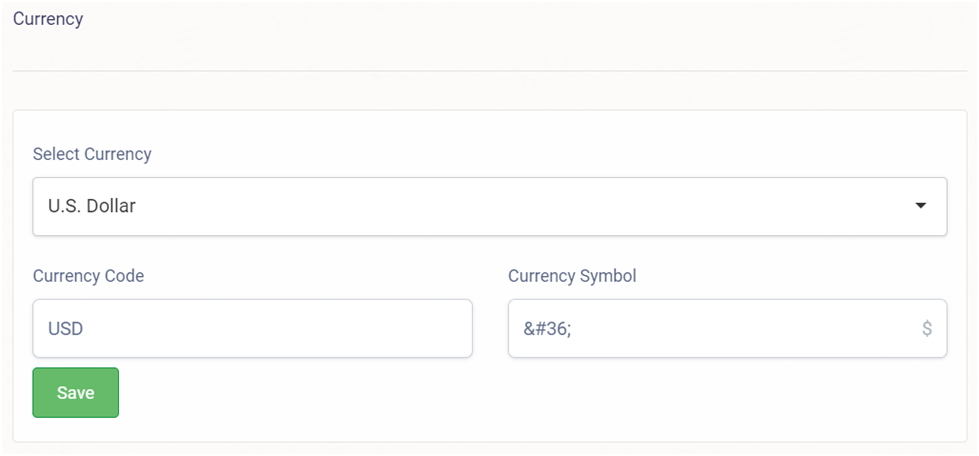
- Select Currency – From here you select & set your preferred currency.
- Currency Code – From here you can manage currency code of your selected currency.
- Currency Symbol – From here you can manage currency symbol of your selected currency.
- Save - By click on save button your currency settings get saved.
Payment Gateways
From here you can set your payment gateway i.e. Stripe.
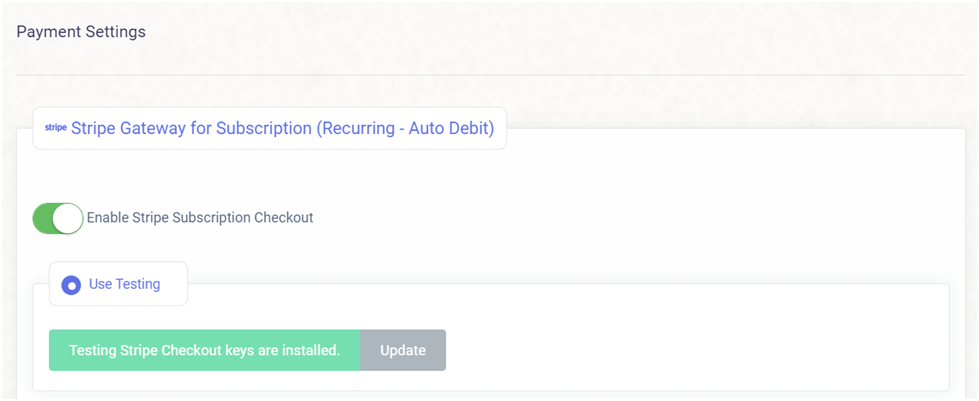
Stripe
- Enable Stripe Subscription Checkout – Using this you can enable Stripe Subscription Checkout for your site.
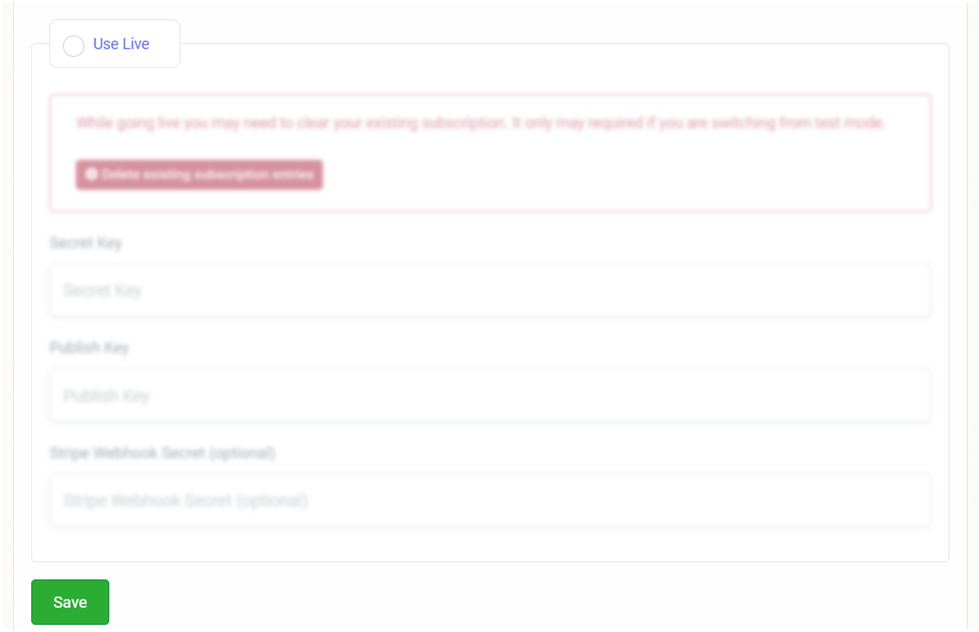
- Use Testing/Live - By selecting any one from this you can set the keys for Stripe Checkout for Testing/Live mode.
- Secret Key - From here you can set your secret key for Stripe Checkout.
- Publish Key – From here you can set your publish key for Stripe Checkout.
- Update - By click on update button your payment gateway settings will be updated.
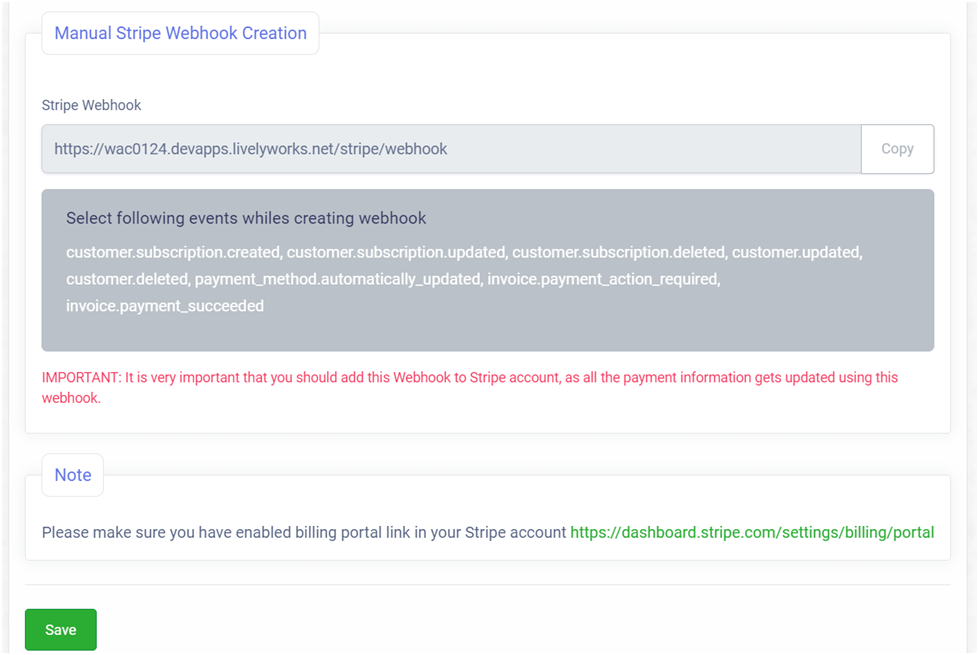
- Manual Stripe Webhook Creation – Using following instructions you can manage manual stripe webhook creation.
- Stripe Webhook –You must need to add this webhook to your stripe account because all payment information gets updated using this webhook.
-
Note: While adding webhook on Stripe for subscription plans, webhook should receive following events
customer.subscription.created
customer.subscription.updateds
customer.subscription.deleted
customer.updated
customer.deleted
invoice.payment_action_required
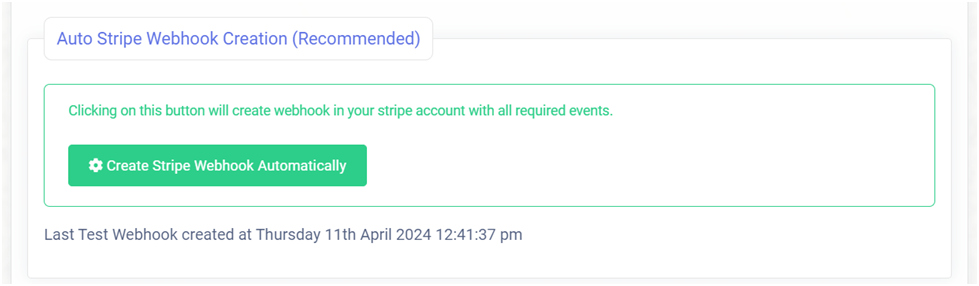
- Auto Stripe Webhook Creation – Using this you can create stripe webhook automatically by click on the Create Stripe Webhook Automatically button.
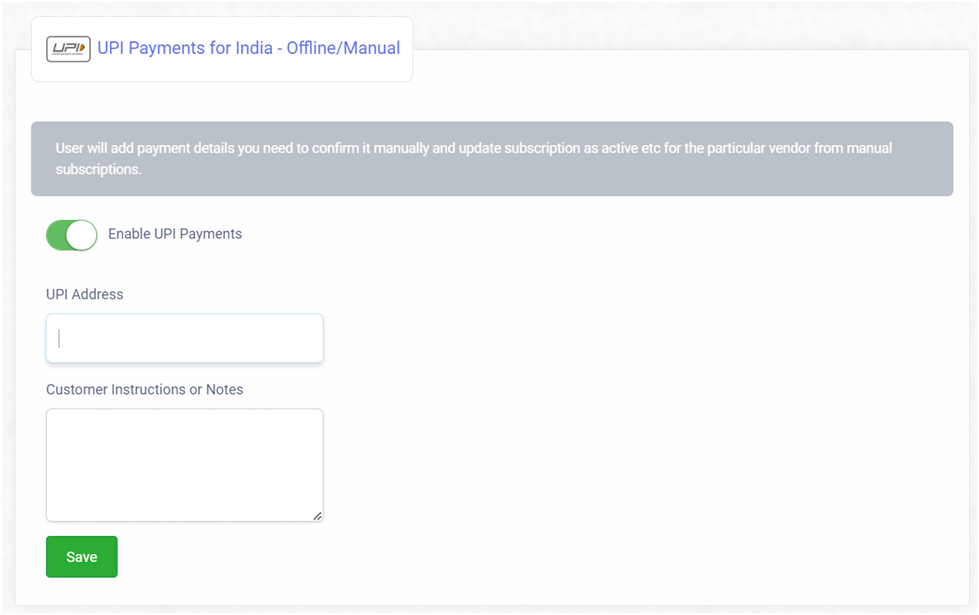
UPI Payments for India – Offline/Manual
- Enable UPI Payments – Using this you can enable UPI Payment for your site which is only for India as Offline/Manual payments.
- UPI Address – From here you can add your UPI address to receive UPI Payments for subscription plans.
- Customer Instructions or Notes – Here you can add any instruction or note for customer which will be shown on Manual Payment page.
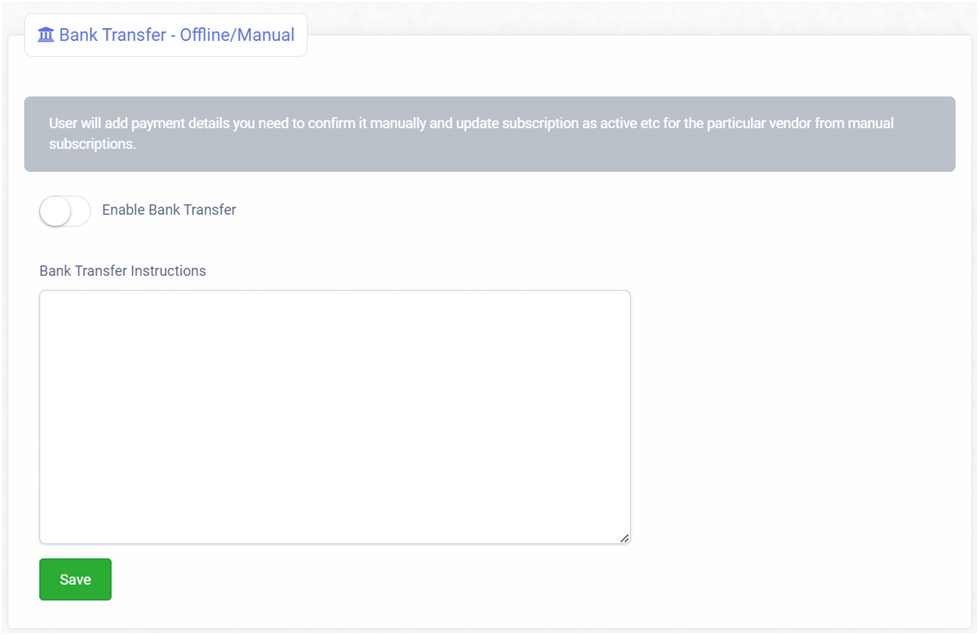
Bank Transfer – Offline/Manual
- Enable Bank Transfer – Using this you can enable Bank Transfer for your site as Offline/Manual payments.
- Bank TransferInstructions – Here you can add any bank transfer instructionsfor your customers which will be shown on Manual Payment page.
Subscription Plans
From here you can manage your all subscription plans as per your need.
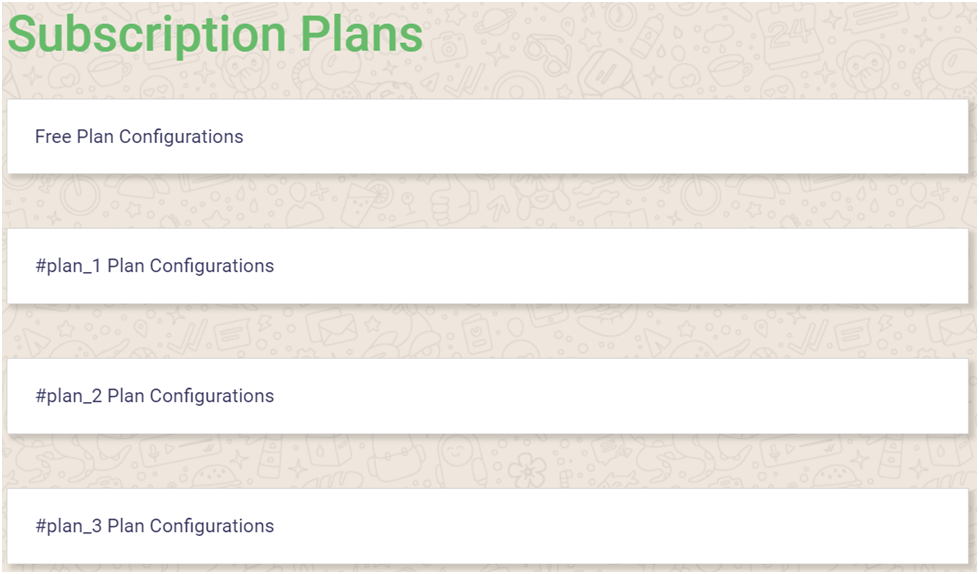
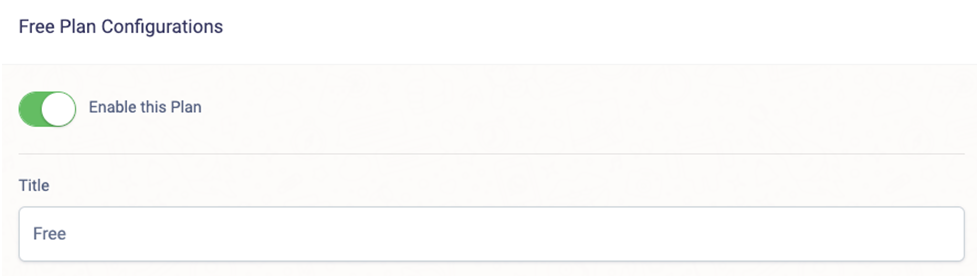

Free Plan Configurations
- Enable this plan – By checking this checkbox from here you can enable free plan for vendors to subscribe.
- Title- From here you can add title for your free plan.
- Feature Limits – Using this section you can limit feature resources for vendors for this particular plan so, vendors can use this service’s features as per plan they subscribe.
- Contacts – From here you can set limits for vendors to add contacts in the system using following field.
- Contact - Using this you can add limit on usage of the contact so, according to that added number vendor can add and use the contacts who subscribe this plan.
- Campaigns - From here you can set limits for vendors to create and use campaigns using following field.
- Campaigns – Using this you can add limits on creation of campaigns so, according to that added number vendor can create and use the campaigns who subscribe this plan.
- Bot Replies - From here you can set limits for vendors to create and use bot replies using following field.
- Bot Replies – Using this you can add limits on creation of bot replies so, according to that added number vendor can create and use the bot replies who subscribe this plan.
- Contact Custom Fields – From here you can set limits for vendors to add contact custom fields in the system using following field.
- Contact Custom Fields - Using this you can add limit on usage of the contact custom fields so, according to that added number vendor can add and use the contact custom fields who subscribe this plan.
- Team Members/Agents – From here you can set limits for Team Member/agents to be user in the account using following field.
- Team Members/Agents- Using this you can add limit on usage of the Team Members/Agents so, according to that added number vendor can add and use the Team Members/Agents who subscribe this plan.
- AI Chat Bot – From here you can enable/disable AI Chat Bot for system who subscribe this plan
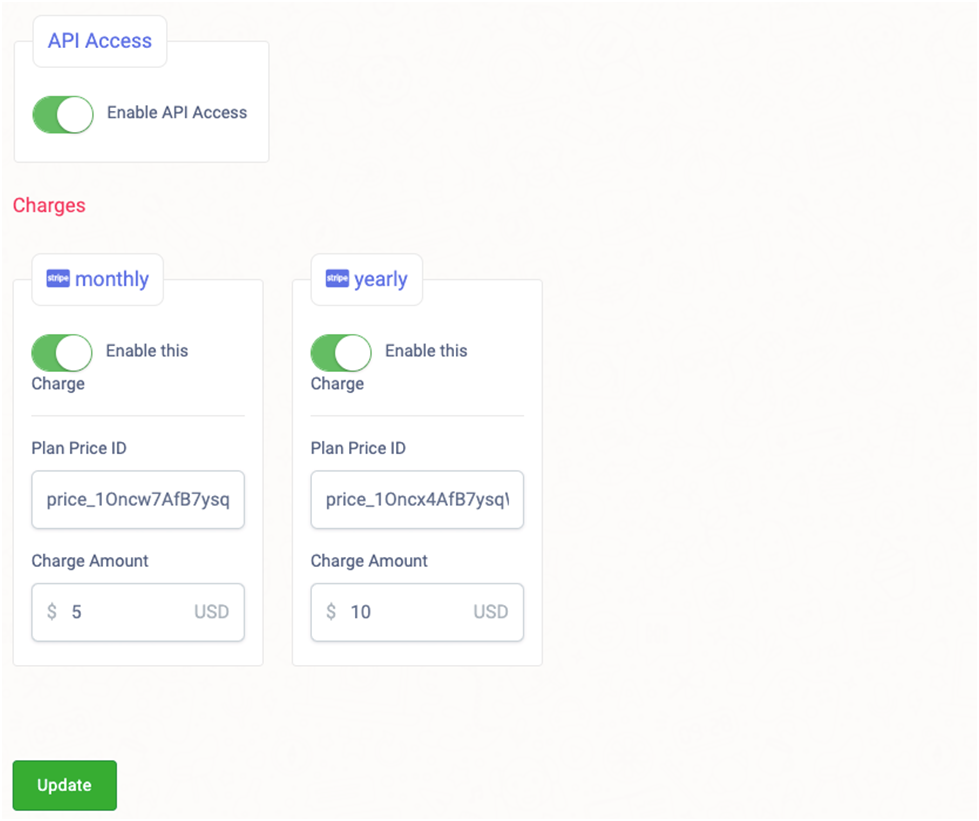
- API Access – From here you can enable/disable API Accessof users who subscribe this plan.
-
Note: If you need to set the any feature limit to unlimited then use -1 for that particular feature.
- Update - By click on Update button you can update your free plan configurations.
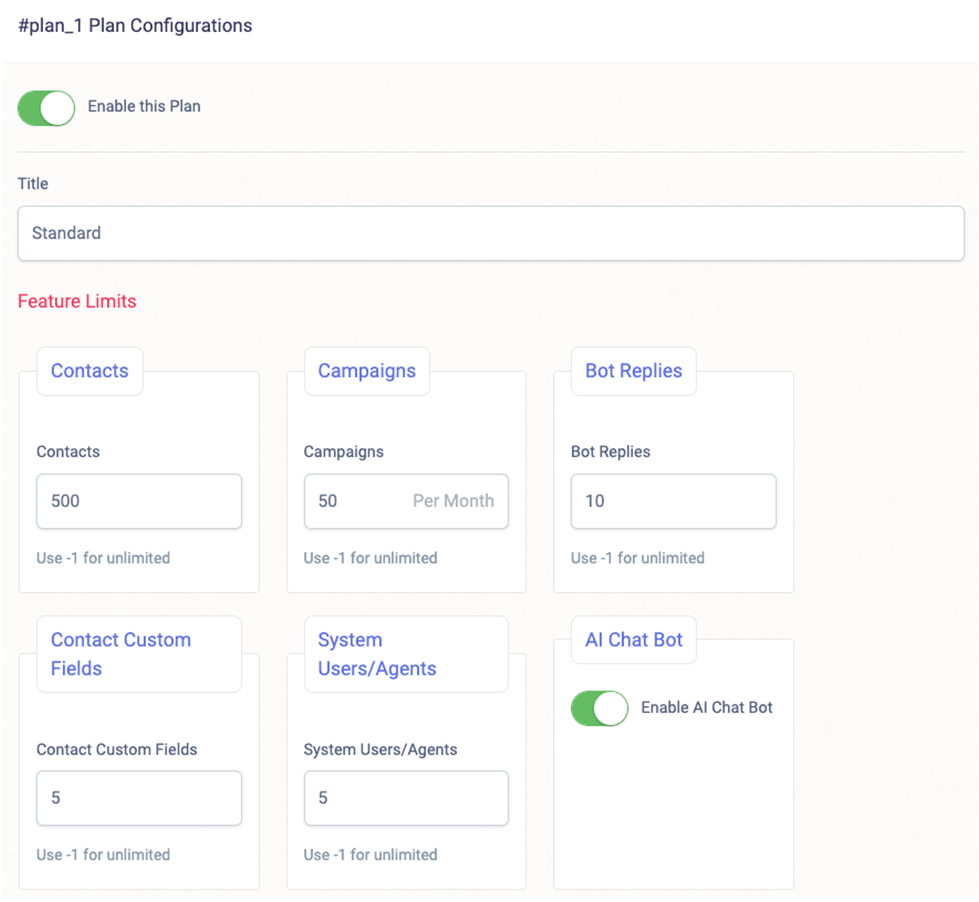
#plan_1 Plan Configurations
- Enable this plan – By checking this checkbox from here you can enable standard plan for vendors to subscribe.
- Title - From here you can add title for your plan.
- Feature Limits – Using this section you can limit feature resources for vendors for this particular plan so, vendors can use this service’s features as per plan they subscribe.
- Contacts – From here you can set limits for vendors to add contacts in the system using following field.
- Contact - Using this you can add limit on usage of the contact so, according to that added number vendor can add and use the contacts who subscribe this plan.
- Campaigns - From here you can set limits for vendors to create and use campaigns using following field.
- Campaigns – Using this you can add limits on creation of campaigns so, according to that added number vendor can create and use the campaigns who subscribe this plan.
- Bot Replies - From here you can set limits for vendors to create and use bot replies using following field.
- Bot Replies – Using this you can add limits on creation of bot replies so, according to that added number vendor can create and use the bot replies who subscribe this plan.
- Contact Custom Fields – From here you can set limits for vendors to add contact custom fields in the system using following field.
- Contact Custom Fields - Using this you can add limit on usage of the contact custom fields so, according to that added number vendor can add and use the contact custom fields who subscribe this plan.
- Team members/Agents – From here you can set limits for Team Member/agents to be user in the account using following field.
- Team members/Agents- Using this you can add limit on usage of the Team Members/Agents so, according to that added number vendor can add and use the Team Members/Agents who subscribe this plan.
- AI Chat Bot – From here you can enable/disable AI Chat Bot for system who subscribe this plan
- API Access – From here you can enable/disable API Accessof users who subscribe this plan.
Note: If you need to set the any feature limit to unlimited then use -1 for that particular feature.
- Charges – Using this section you can set the charges for this subscription plan on monthly & yearly basis so, vendor can purchase the subscription plan accordingly.
- Monthly – From here you can set charges for subscription plan on the monthly basis.
- Enable this Charge – By enabling this you can make available monthly charges for purchasing subscription plan to the vendors.
- Plan Price ID – Here you can add your stripe plan price ID.
Note: To get Plan Price ID you need to create new product in your Stripe account. Under this product add prices as needed & matched with subscriptions plan in admin section.Anduse the Price Idsin respective charges section of admin.
- Charge Amount – Here you can add the monthly charge amount for this subscription plan.
- Yearly – From here you can set charges for subscription plan for the yearly basis.
- Enable this Charge – By enabling this you can make available yearly charges for purchasing subscription plan to the vendors.
- Plan Price ID – Here you can add your stripe plan price ID.
- Charge Amount - Here you can add the monthly charge amount for this subscription plan.
- Update - By click on Update button you can update your plan configurations.
Please Note:If you need to add more subscription plan in your site then you can add one more block plan code of subscription plan with unique id under the paid item which is available in config/lw-plans.php file.
Email Settings
From here you can manage your email setting.
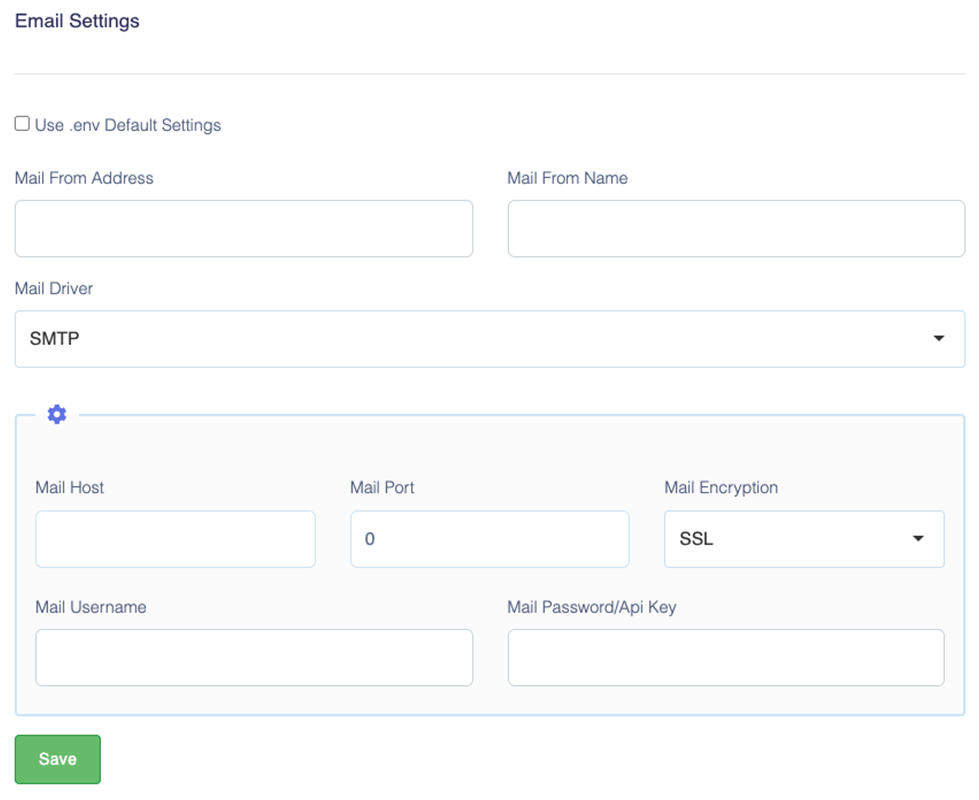
- By default .env settings are enable. If you disable .env setting then you have to select following to manage email settings.
- Mail From Address – From here you can add your mail from address.
- Mail From Name - From here you can add your mail from name.
- Mail Driver – Using this you can select your mail driver for sending emails also as per selected mail driver you have to set required information to set mail driver.
- Save - By click on save button your email settings get saved.
Social Login
From here you can manage your setup for social login.
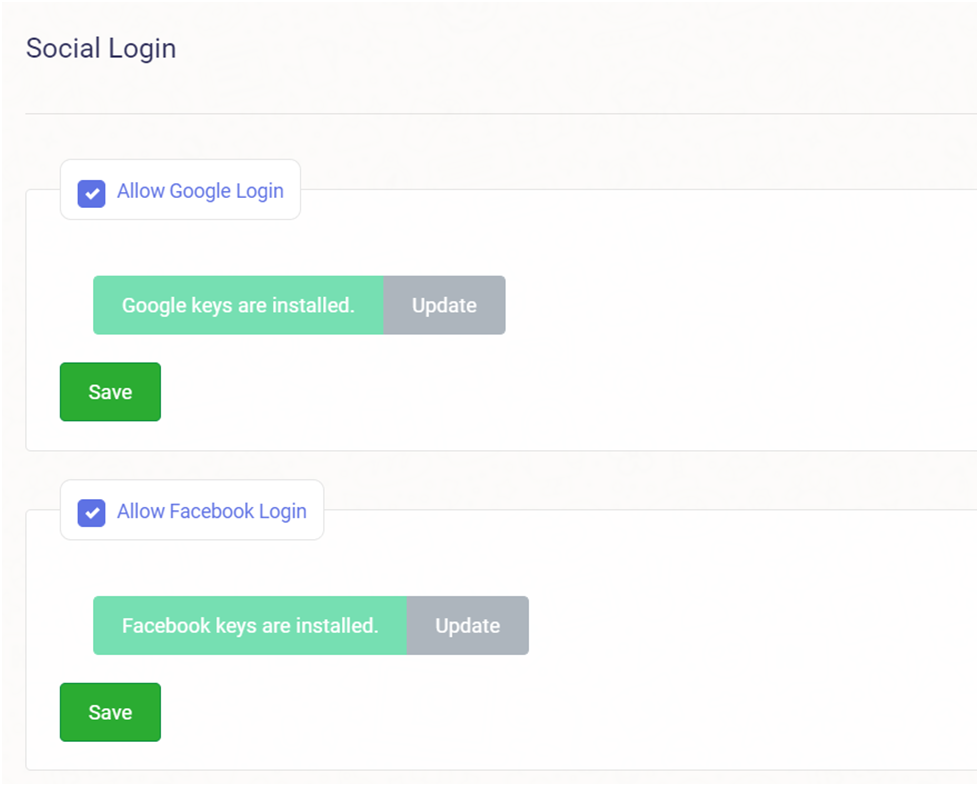
- Allow Facebook/Google Login – Using this you can enable/disable both social login & set keys for both.
- Update – By click on update button your settings get updated.
Setup and Integrations
From here you can manage your all setups and integrations.
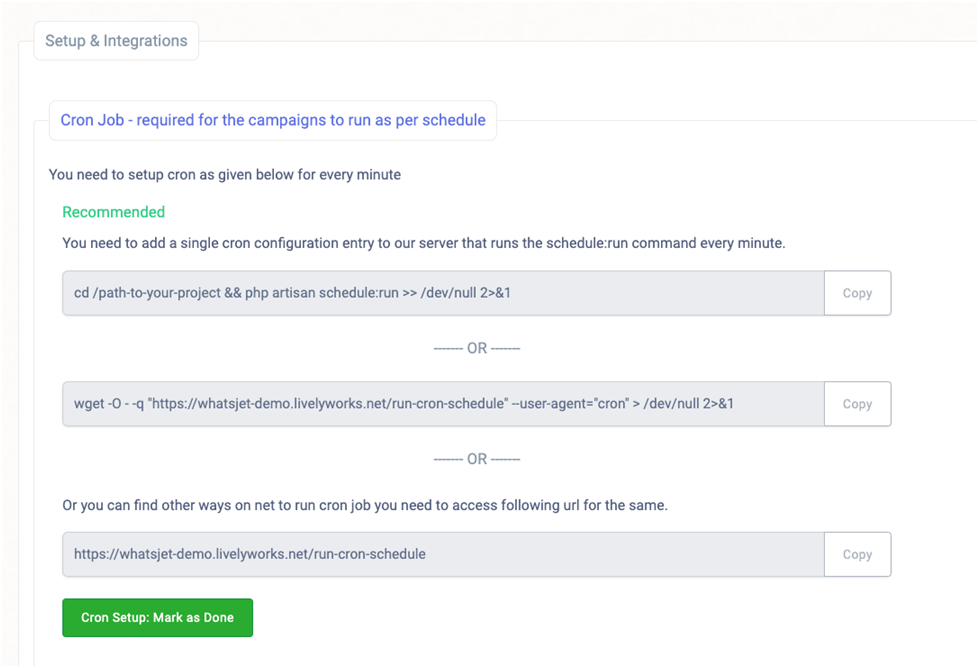


- Cron Job – From here you can setup the CRON as per instructions given which is required for campaigns to run as per schedule. You can also use services like https://cron-job.org/ for CRON jobs.
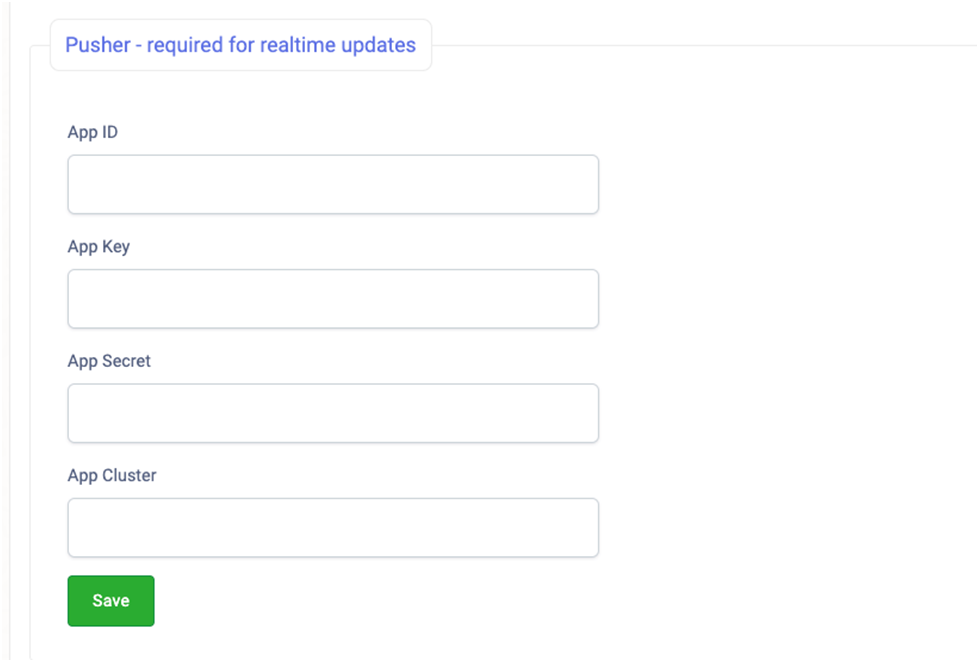
Once you setup the CRON click on the Cron Setup: Mark as Done. - Pusher - From here you can manage enable/disable pusher integration and set keys for pusher notificationsi.e., required for real-time updates.
- Microsoft Translator API
- Microsoft Translator API Key – You need to add this key for using the Microsoft Translatorin translations.
- GoogleReCaptcha – From here you can manage enable/disable settings for the ReCaptcha and set keys for it which is required for the use ReCaptcha on various pages like Login etc.
- API Documentation URL – From here you can manage API documentation URL for vendors.
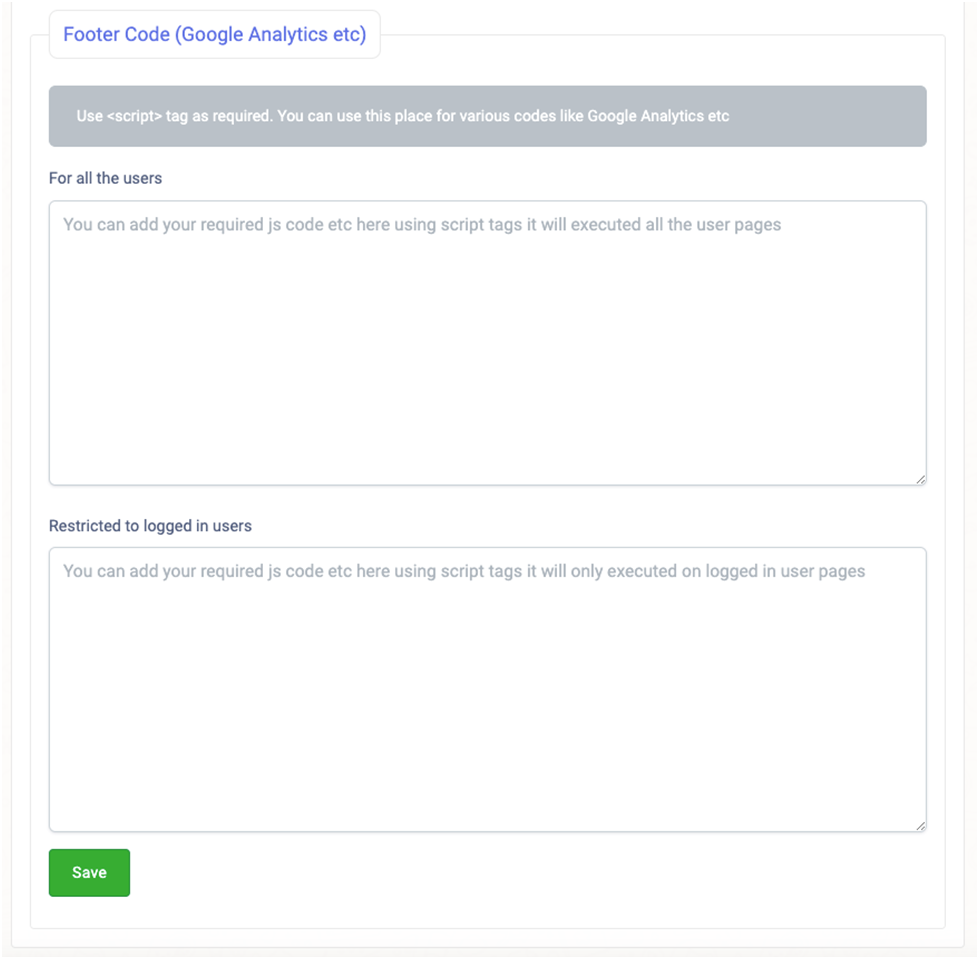
- Footer Code – From here you can manage Footer code for Google Analytics etc. using following two areas.
- For all the Users – From here you can manage Footer code for Google Analytics etc for all users.
- Restricted to login users - From here you can manage Footer code for Google Analytics etc which is restricted for login users.
- Save - By click on save button your integration keys get saved.
License Information
To activate and access the superadminsection you have to go through the Envato License Verification process by just adding your purchase information.
You can complete this License Verification by putting following license information
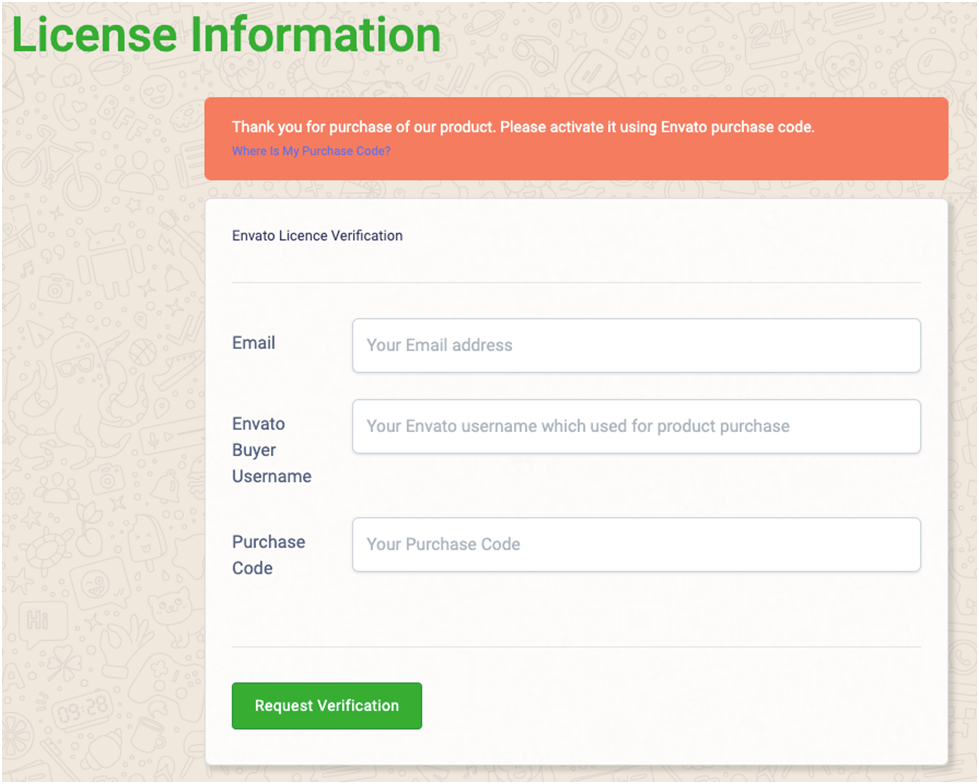
- Email – Here you have to add your email.
- Envato Buyer Username – In this field you have to add your Envato Buyer Username to activate license.
- Purchase Code –Using this you have to add your Purchase Code of product to activate license.
- Request Verification – By click on this button you can request for license verification.
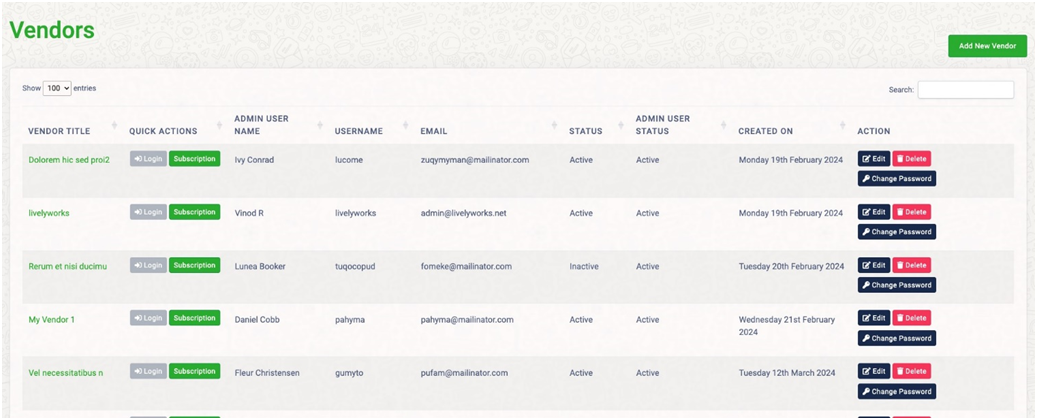
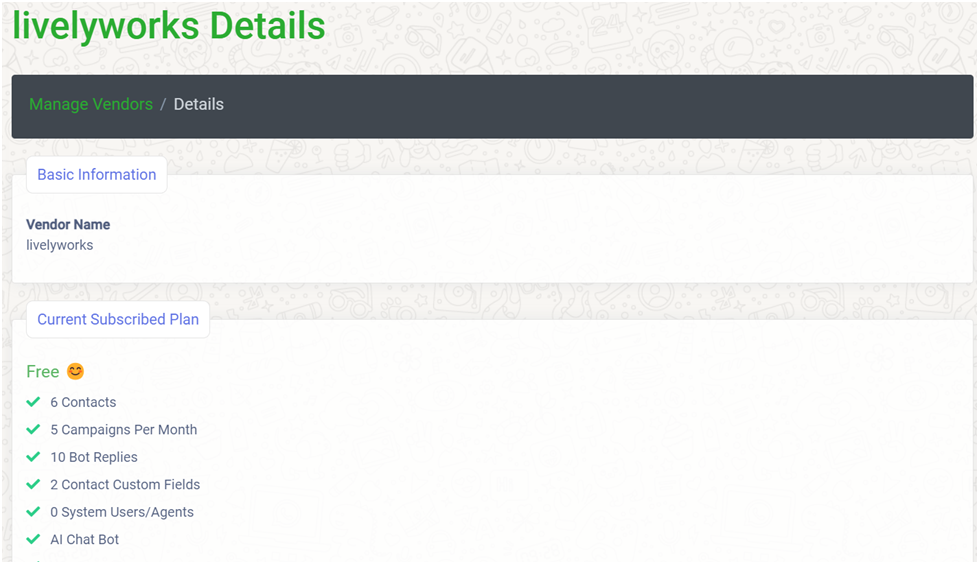
Vendors
Using this you will be able to add vendors for the site as superadmin. You can view new registered & added vendors right from here.
Add New Vendor
- To add vendor, click on the Add New Vendor button.
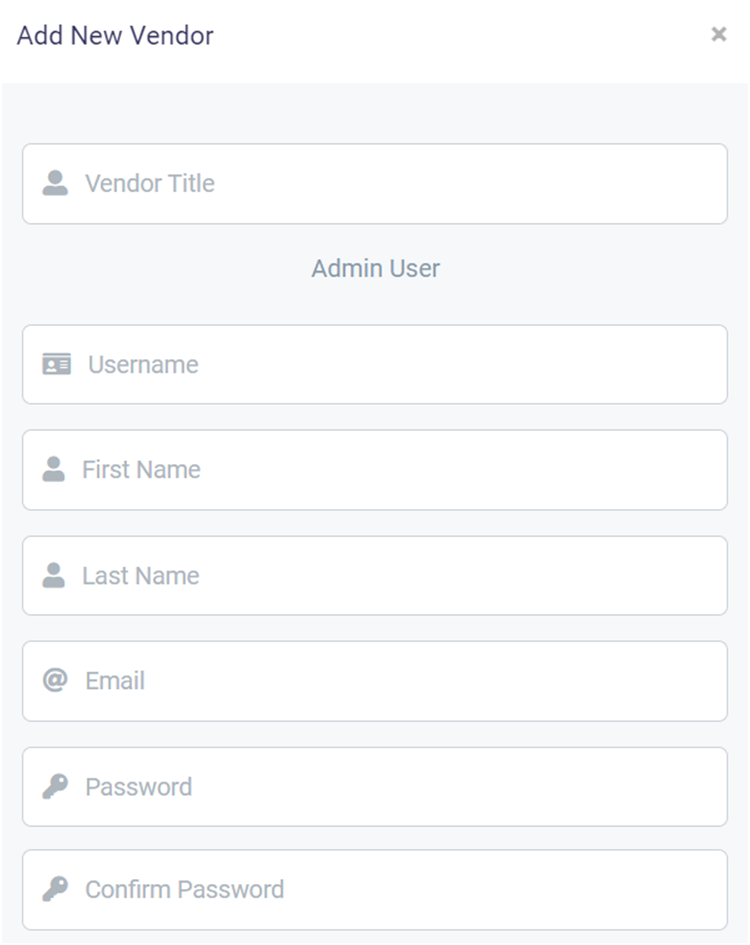
- Vendor Title –You can add title of vendor from here.
- Username – Using this you can add vendors username.
- First Name – Using this you can add vendors first name.
- Last Name - Using this you can add vendor’s last name.
- Email– You can add Email of vendor in this field.
- Password-You can add Password of vendor right from here.
- Confirm Password -You can add Password for confirmation right from here.
- Add - On click on Add buttonyour Vendor will be added.
- Edit – By click on edit button for particular vendor form for edit vendor will opens for you, from where you can edit the information of that particular vendor.
- Vendor Status – By using this you can manage the status of particular vendor.
- Admin User Status - By using this you can manage the admin user status of any vendor.
- Delete – Using this you can delete any vendor which is available in the vendors list.
- Change Password – Using this you can change the password of that particular vendor.
- Login – Using this login button you can login as that particular vendor & able to access whole vendor’s account.
- Subscription – From here you can manage vendors manual subscription as mension in manual subscription area.
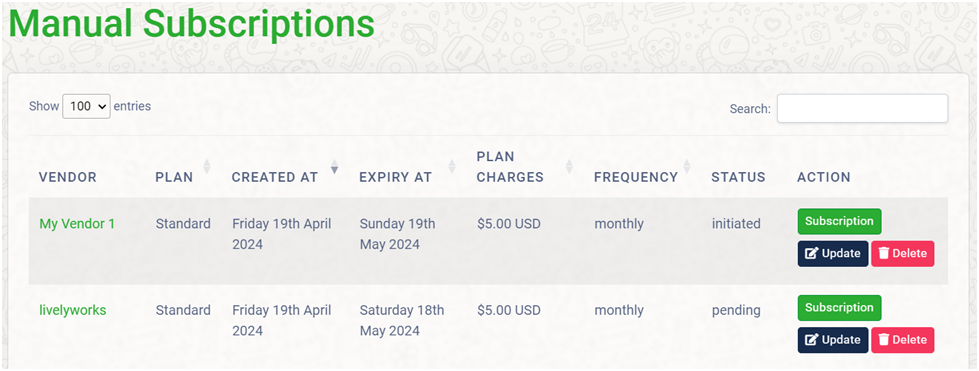
Subscriptions
From here you will be able to view all the details of all auto & manual subscriptions purchased by vendors for this site.
Auto Subscription
From here you can view all your subscription done by auto payments.
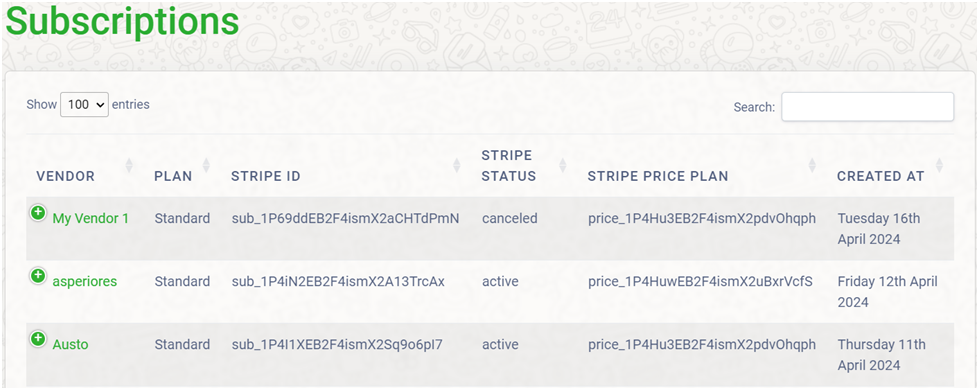
Manual Subscription
From here you can view all your subscription done by manual paymentseither by UPI Payments or Bank Transfers.
- For manual payments vendors can choose the plan & make the payment by both ways UPI Payments or Bank Transfers then with details of this transaction sent the request to subscribe the plan.
- All that requests are comes under manual subscription to make it active plans for vendor.
- From here admin can allocate plans to the vendors.
- Subscription – From here you can manage the subscription of the vendor.
- Create New Subscription – Using this you can create new subscription for the vendors.
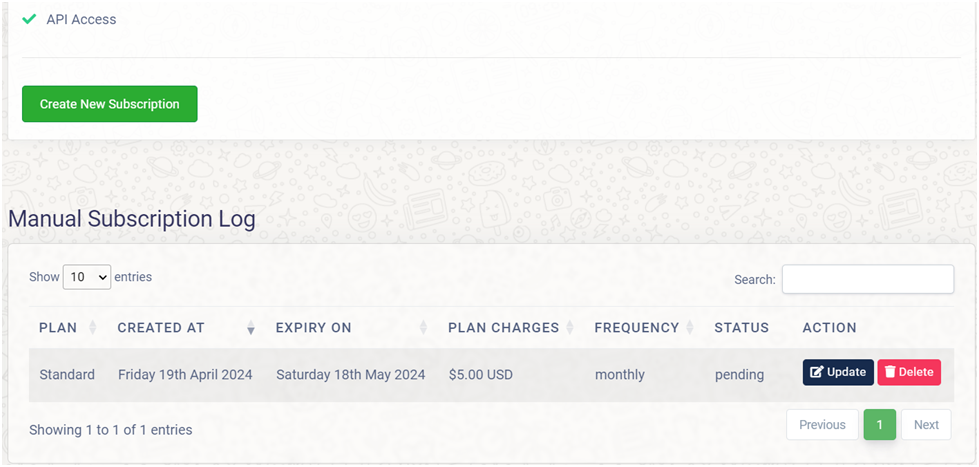
- Update – From here you can update the subscription of the vendor.

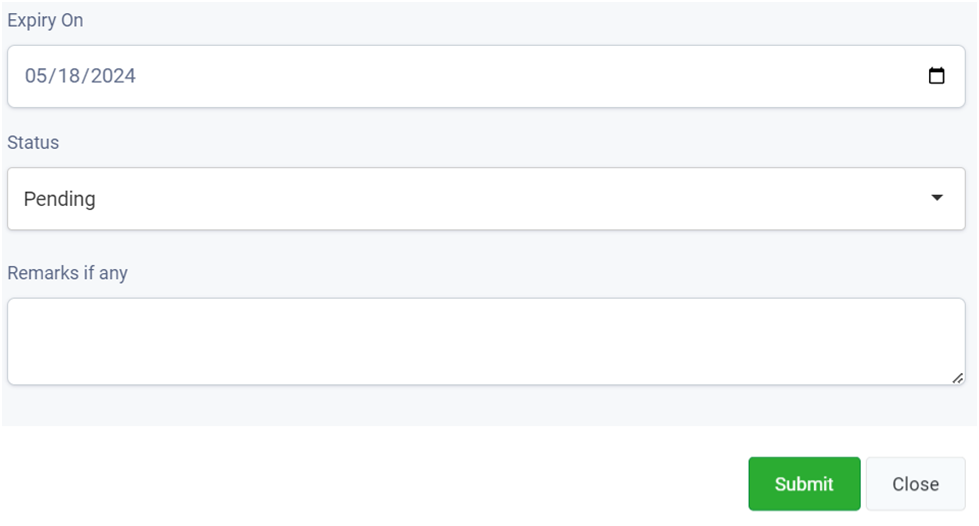
- From this update subscription you can manage Charges, Expiry On, Status of vendors subscription plan.
- Delete - From here you can delete the created subscription of the vendor.
Translation Languages
Using this section, you can manage your languages & its translations as per each language. You can add, edit& delete languages from here.
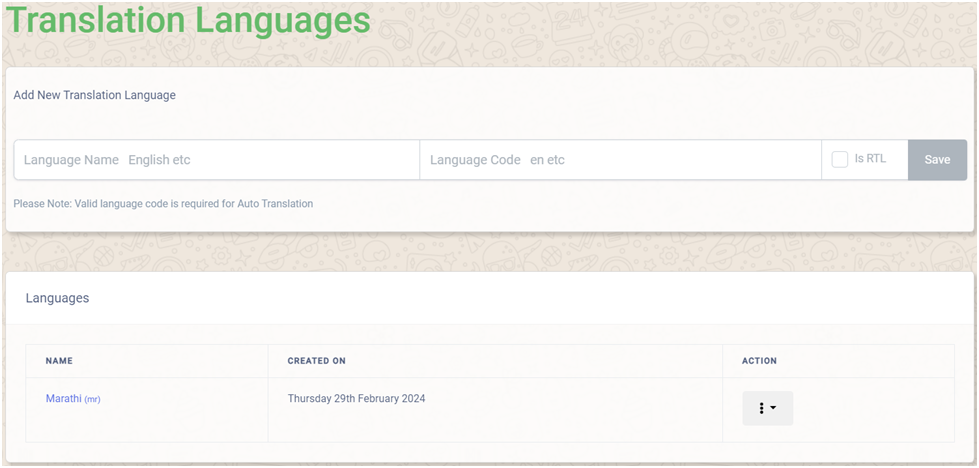
Add New Translation Language
- To add new language, you must add all required information related to that language and save that language.
- Language Name –From here you can add new translation language.
- Language Code – Using this you can add language code for the translation language.
- Auto Translate using Microsoft – If you check this checkbox while adding new language then then all strings of the system are gets translated while creating the new language. You don’t need to translate it separately.
- Is RTL – Using this checkbox you decide that whether this language is RLT or not.
- Save –By adding all information to add new translation language and click on save this Save button new language will be added.
- By click on the language name you can manage the particular language translation using Auto translations or Microsoft Translator.
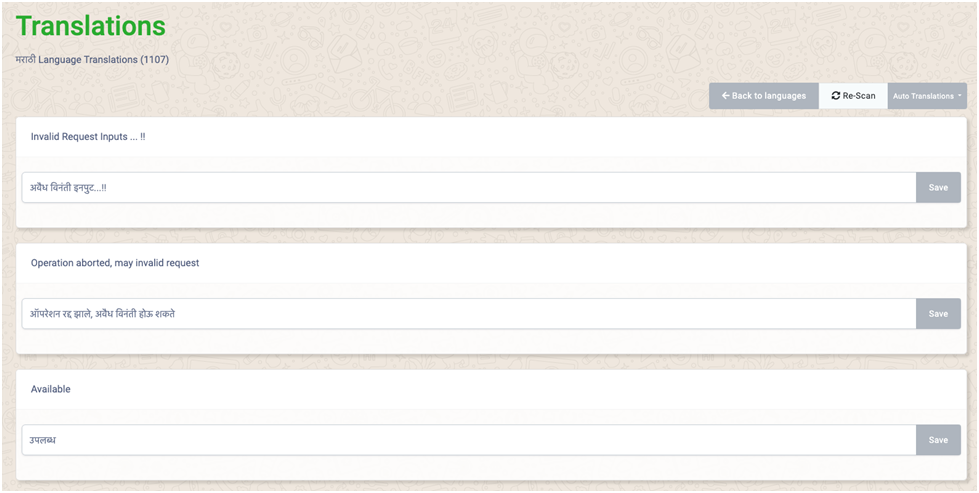
- Re-Scan – Using this you can get more added strings for translation.
- Auto Translations – It contains two options to auto translate the any language one is Microsoft Translator & another is Auto translations (Google Spreadsheet)
- Microsoft Translator - Using this you can auto translate all strings at a time using Microsoft Translator.
- Auto translations (Google Spreadsheet) – Using this you can auto translate all strings using Google Spreadsheet just by exporting & importing the sheet. When you click on Auto translations (Google Spreadsheet) then you will get the all information regarding how to create it.
- Save – You can use Save button to save the auto translated single string.
Thank You
This information would help you to customize understand application better
Once again thank you so much for purchasing this product. I would be glad to help you if you have any questions relating to this product. No guarantees, but I will do my best to assist.
We are small team of Mobile and Web Designer & Developers, here are some of the Great tools and technologies we use day2day for the development: HTML5, CSS3, jQuery, PHP, Laravel, Flutter etc.
We also build iOS & Android Application.
If you need any Customization Work / Support on this Product or having any project for us. Please feel free to email us at [email protected]
Thank You & Good Luck